Want to Become An Expert In Marketing Technology?
Marketing is an indispensable part of business, or of profitable business. The old days of marketing were limited to banner ads, events, door to door, word of mouth, television advertisement, and radio advertisement. Modern day technologies and internet have completely transformed marketing. Nowadays, marketing is a vast term that encompasses both the “old days’” and todays’ techniques. Marketers must possess a strong understanding of their industry and customers, as well the capability to think out of the box and use the tools and technologies of the trade.
MarTech has become a buzzword, which is a term used to identify tools and technologies used for marketing. Here are examples of MarTech,, why marketers use and should continue using MarTech, and how it is used to make a marketing approach more efficient.
MarTech – A combination of Marketing and technologies
MarTech could be any technology or software that helps a marketer plan, execute, analyze, and optimize marketing campaigns to efficiently achieve previously set marketing goals. MarTech applications automate and streamline a marketer’s day-to-day activities.
MarTech simplifies –
- Planning and execution of marketing campaigns;
- Collection and analysis of the results of marketing campaigns;
- Measurement, tracking, and analysis of the market campaign’s performance;
- Implementation of the insights in future campaigns.
Key MarTech Categories
S.No | Categories | Sub-categories | Examples |
---|---|---|---|
1 | Content Marketing Tools | Content Management system, Search engine optimization, Landing Page and A/B testing, Content Curation Tools, Content marketing platforms, Digital Asset management, Lead magnets | WordPress, HubSpot, Drupal, Moz, Ubersuggest, Yoast SEO, Coveo, Unbounce, Wix, Instapage, Scoop.It, BuzzSumo, HubSpot, Marketo, Adobe Experience Manager, Bynder, OptinMonster, Sumo, Bloom, etc. |
2 | Rich Media Tools | Video making tools, Video Marketing platforms, Podcasting tools and apps, Graphic design tools, Interactive content | Biteable, DaVinci Resolve, Wistia, YouTube, Vimeo,IBM Cloud Video, iTunes, Google Podcasts, Canva, Pixlr, Adobe Creative Cloud, SnapApp, Prezi, etc. |
3 | Social Media Tools | Social Media management tools, Social Media Monitoring tools, Influencer Marketing platforms | Hootsuite, Google Alerts, Upfluence, Brand24, etc. |
4 | Marketing Automation Platforms & Tools | Marketing Automation software, Email Marketing Tools, Mobile Marketing platforms | Hubspot, CleverTap, Marketo, Salesforce, Marketing Cloud, MailChimp, etc. |
5 | Advertising Platforms and Tools | Search engine marketing, Social Media advertising, Native advertising, Programmatic advertising | Google Adwords, Bing, Qwaya, SmartyAds, Taboola, etc. |
5 | Sales Enablement Tools | Sales Automation Platform, Customer Support tools, Customer relationship management | Zoho, Zendesk, HubSpot, Salesforce, Outreach, etc. |
6 | Data and Analytics Platforms | Data management platforms, Customer Data platforms, Web analytics, Tag management, Predictive analytics | Adobe Audience Manager, Google Analytics, Kissmetrics, Evergage, Google Tag Manager, Aviso, etc. |
How to use and deploy Martech in business process
There are more than 5,000 MarTech products catering to different industries, meeting marketers’ challenges, and reaching different areas of marketing. Selection of relevant MarTech depends upon need and complexity of the technology. For instance, WordPress is a MarTech solution that meets the needs of a blog or CMS website.
Businesses need to have a clear, centralized vision and marketing plan/goals before adopting a MarTech product. Otherwise, the business might accidentally adopt multiple technologies with similar or overlapping features. For instance, one department is using Mailchimp for email marketing and another one is using Marketo, adding to avoidable business expenses.
Finding the quintessential MarTech solution for each organization completely depends on each one’s business model, size, resources, business goals, and requirements. Also, keep in mind that your marketing goals will change as you meet and surpass each one, so you need a tool that will allow for this growth.
Arrange your MarTech Tools to bring efficiency
The collection of all marketing tools and technologies is called MarTech Stack. To reach your marketing goals, it is vital that all of your MarTech tools integrate or meet at different stages of the marketing funnel. An organized MarTech Stack leads to:-
- Marketers conveniently integrate and share relevant marketing data to create meaningful reports easily.
- Marketers easily select the most relevant apps or tools for their requirements, boosting efficiency.
- Less downtime since some of these tools can assist in interdepartmental sharing. All of the above equal better efficiency, which we all know is equal to more revenue.
How to make a perfect MarTech stack
- Marketers may get confused as to which Martech tools should be used as they have loads of choices available to them. To build a MarTech Stack that can bring the desired result, you should take a look at your marketing process and funnel. Here are few key points and questions that can help create an effective MarTech Stack:
Understand your business model: What is the product or service? Are you a B2B or B2C business, Business sector? Is there a natural sales cycle, Pricing model? - Understand each and every stage of your marketing funnel. How do you process these steps in marketing funnel –awareness, interest, purchase, consideration, post purchase evaluation, and repurchase?
- What is your marketing approach? How do you collect customer data? How do you create customer personas? How do you communicate with your customers? What are your strategies for content distribution across multiple platforms? How do you identify and nurture the leads? How you track your campaign’s performance, and how you get and use insights from reports?
A lot goes into making MarTech decisions, but remember that this investment will propel your business toward your preset marketing goals and desired revenue.
Conceptualization of MarTech Stack
Now, start making a list of MarTech tools that you require to create a market funnel that suits your business model and goals.
You need to understand that every business has its own unique requirements and thus they need a unique MarTech Stack, however there are a few tools and technologies that you can expect to add or consider adding to your MarTech Stack:
- Content Management system
- Email marketing tool
- Social media platforms
- Automation software
- Analytic tools
- Conversion tools
- CRM tools
- Customer service
Take one step more to become a leader
You know now what MarTech and a MarTech Stack are, why you should adopt these two into your marketing approach, and how you could implement these. No matter what solutions you go with, there are a set of traits that you must own or be willing to develop to become a tech marketing expert in MarTech:-
- Ability to think critically and creatively. You must be creative in approaching people, showcasing your products, and so on.
- Be ready to take calculated risk. As every approach is based on set goals, you should have the ability to take risks to determine the most effective marketing strategy.
- MarTech always bring new changes and updates, so you must be willing to learn.
- Longevity to gain experience. You should have in-depth knowledge of at least one marketing area and know how to make a great marketing strategy.
The Parting words
Becoming a tech marketing expert in Marketing Technologies is not easy; it requires a lot of research, creativity, out-of-box thinking, marketing expertise, as well as a little bit of technical knowledge. Look, you’ve just added to your knowledge by reading about the umbrella term MarTech and the unlimited opportunities it unlocks for marketers.
If you still have questions or want to know more about MarTech feel free to contact us at +1-847-592-2920 or marketing@nextrow.com.
How To Plan And Migrate To Marketo
Migrating your current marketing automation to Marketo is an easy decision to make, but there is a huge volume of data, growing daily, that makes the transition tricky. Moreover, marketers need to keep up with the many channels’ customers use to remain relevant. Marketo steps in as one of the best B2B marketing automation software options around, simplifying this work, helping you manage your marketing process with ease, and giving you more opportunity to engage with you clients.
This platform is trusted by millions, in businesses across the globe. Choosing the right marketing automation software for your company might seem daunting, until you learn more about Marketo.
Why you should consider migrating to Marketo
Marketo incorporates the latest techniques and technology to provide programs capable of solving modern marketing problems and simplifying a marketer’s work. Here are a few reasons why Marketo is recognized as a leader in the market by renowned technology research firms like Gartner and Forrester:
- Supports multiple channels and has configured templates, so campaign replication becomes faster and easier
- Easy Salesforce cloud integration (and MS-Dynamics)
- Better analytics and reporting tools
- Simplified campaign creation
- Offers a rich ecosystem for marketing technologies and partners
- With partitions and workspaces, you can keep everything separated
All in all, Marketo redefines marketing efforts by nurturing marketing campaigns; it aligns your marketing campaigns to achieve your marketing goals in a simpler and faster manner.
Let’s look at the process of migrating to Marketo.
Initiation of Marketo Migration
It is true, Marketo migration from your existing marketing software is complex and requires heavy lifting. You’ll need to consider:
- What to do with your existing marketing data;
- Safety measures that you need to follow during migration to avoid any losses;
- How you can migrate the data to Marketo, and more.
This article explains everything, including preparing yourself for migration. Let’s start with the preparation steps for migration.
Planning and Preparation
Preparation, planning, and strategy are key to a successful Marketo migration. You need to understand the current scenario, your requirement for migration, your marketing goals, etc. Here are a few tasks to complete before starting the migration process:
- Mark it as an important project
Consider it a major project and assign a manager to oversee the process. It will require involvement of the sales, marketing, and IT teams to make the migration process faster and easier. So, identify the right person from each team to spearhead his/her department’s side of the project.
- Define your goals
What you are expecting from migration? What do you hope to accomplish in the future with Marketo? Consider the differences between automation terminology and Marketo’s terminology, and document everything. This will help you redefine your marketing capabilities and approaches, and thus produce effective results.
- Plan your activities
Create a timelinefor all the activities required in Marketo migration, andplan for sunsetting your current marketing automation tool. Based on your current marketing automation tool’s sunsetting time, schedule a date for migration. Define your day-to-day activities, assign and delegate accesses to the marketing team, and define your budget.
- Prepare your Legacy Systems
Now, it is a good time to clean up your assets, such as database, files, and campaigns. Consider which of these should be migrated and those that should not be. Prioritizing them for migration and focusing on ridding your database of junk will make your migration faster.
Next, you will need to upload all your assets and share them in a team folder, creating a central repository of assets that can easily be migrated to Marketo.
Now you’re ready to migrate
You have developed a strategy, perspective, and goals. It’s time to start phasing out your current marketing automation software for Marketo.
- Replicate and integrate your assets
In this phase, you need to organize your inventory. It is necessary to work on what files should migrate, how they should migrate, and how to prioritize the migration. Export files in a suitable format and map them in Marketo.
Here are the most important contents that must be addressed accordingly:
Database
- Clean up the prospect database, so you can start your Marketo journey with more valuable data.
- Export the current database in Excel or CSV.
- It is especially important to export the unsubscribe list so that anyone who has unsubscribed from your marketing emails in the past will not be included in the list again.
- Remove custom fields, or columns, that you have marked to not include in import into Marketo from your prospect’s spreadsheet. Make a list of used and unused fields in a separate Excel sheet to replicate those fields in Marketo faster. Later, once you sync with CRM, you will map the respective fields to the corresponding fields.
- Import your list of unsubscribed users into the Marketo instance and choose global unsubscribe. This will ensure that the respective prospects are immediately unsubscribed from Marketo and are not present in the email database. This should be done as soon as possible to avoid any impact on Marketo’s IPs.
- Inventory all email templates in the previous marketing automation tool. Decide which ones should be migrated to Marketo, and then inventory all your sent email contents.
- For a personalized email template, you can create custom email templates in Marketo using HTML / CSS and a text editor.
- Copy Email content from the shared folder and paste it into new Marketo templates.
Landing Pages
- Decide which landing pages you want to recreate in Marketo. Define their purpose based on the traffic to the pages. This will help you to prioritize them for migration.
- Use Marketo Landing Page Builder and the default template to create the personalized landing pages that will include your business branding. The template will be responsive and works with mobile devices as well.
- Developers can create a personalized landing page template by using custom templates in Marketo with HTML / CSS and a text editor.
Forms
- Forms play a major role when migrating to Marketo. Write down any form you want to migrate to Marketo. List the notes on all the fields used in each form and the automatic responses will appear after the form is submitted.
- Recreate the forms using Marketo’s Form Builder. Add all the fields needed to create the form that will generate the same information about potential prospects as your old forms.
- Add necessary completion actions, autoresponder emails, and thank you messages. Then, these forms will have a similar function to your old system.
Lists
- Make a note of any valuable list or smart list that you want to move to Marketo.
- Take detailed notes on the Default/Custom fields.
- The segmented lists will be processed based on the criteria a prospect must meet to fall into your smart lists.
- Target lists and segmentation of the audiences are crucial to create personalized emails and other content.
- Process and workflows will be your new smartlist.
Files
- List all files from the old marketing automation tool. Make a backup of all white papers, images, or gated contents that you want to import to Marketo.
- Upload all the fields you saved in the Shared Drive to Marketo Design Studio.
Scoring Criteria
- Take a backup of all scoring criteria from the previous marketing automation tool, along with the total points allocated for each section.
- Include the sales team to align sales and marketing with the lead scoring criteria. This will ensure that all lead scores are normalized in Marketing and Sales with Marketo.
- Add custom scores or change Marketo’s default rating system to match your rating criteria.
Automation
- Make detailed notes on any triggers in your automated tasks and logic in the engagement program, if you want the same process.
- Recreate Marketo’s automated programs into marketing activities using the same logic including actions, triggers, and rules.
CRM Integration
- Now that the fields are already created in Marketo, you just need to map them to the corresponding Salesforce field. Choose the sync behavior for each custom field created to determine whether Salesforce, Marketo, or the most recently updated record takes precedence.
Add a section somewhere for workflows, and segmentation, personalization.And also write about training the team on Marketo
Test and train
This step will help you and your team understand the new marketing approach and tools available with Marketo. Everything comes together in this step, so remember to:
- Test landing pages with respect to forms and auto-response functions.
- Check out how the data is appearing in CRM.
- Check out new reports for format and accuracy.
- Keep every department in the loop.
Once you have completed the few steps above, get ready for the first campaign launch by making sure your team receives Marketo training. As with any other tool, it doesn’t matter how valuable the tool is if you don’t know how to use it correctly. After putting so much time into migrating to Marketo, you should also plan for training everyone that will use Marketo.
Begin Your New Journey
Once you are done with all the processes, you are ready to begin your journey with Marketo. This is a complex and time-consuming project, depending upon the complexity involved in your old process, but the return on investment will be palpable. As you know, migrating from one MA platform to another can be trying, but with proper planning and Marketo experts around, you can minimize the risks and maximize the benefits of Marketo from day one.
If you want to train your team or aren’t sure whether you’re getting the most out of Marketo, NextRow Digital can help. We provide company specific training and show your team what Marketo can do. If you have experience in Marketo but would like to expand upon your skillset, we also offer training options to take you to the next level.
If you need any assistance in Marketo Migration, contact us at info@nextrow.com. Our Marketo experts will help you every step of the way, from pre-migration – no matter what your previous marketing automation system was – to training.
Adobe Summit 2021 – An Influential Event to Learn and Grow for Marketers and Technologists
After last year’s greatly successful Adobe Summit event
Adobe Target: Basics and Beyond
Adobe Target is a website optimization tool that enables data-driven marketers to optimize and deliver personalized, content-led experiences to their customers. Known for its A/B testing and multivariate testing, Target can help you decipher the prospects’ journey and build an engaging audience segment to convert MQLs into SQLs, thereby improving the overall conversion rate. It makes it easy for enterprises to modify the webpages for short-term campaigns and testing, allowing you to display certain content dynamically to a specific set of audiences.
Featuring integration capability with Adobe Analytics for reporting purposes and audience creation to deliver different content to different types of visitors, Adobe Experience Manager for delivering dynamic content, Adobe Audience Manager for an integrated audience, and other Adobe Experience Cloud Platform Products, Adobe Target helps enterprises to deliver targeted and personalized content on the web and mobile sites, email and acquisition channels, mobile apps, internet-connected screens, devices, or any other channel that has content and can be tagged.
What can you do with Adobe Target?
Adobe Target contains activities, locations, experiences, offers, and audience. An activity allows you to test and target content to a specific audience that visit your website. That said, an activity has a start date (when?), a measurable goal (why?), and defines the experiences that each audience should see (what, where, to whom?).
Following are the different types of activities in Adobe Target which caters to specific goals:
- A/B Testing: Giving you a whole new experience, A/B Testing allows you to compare two or more variations of content at the same time to determine the best version for your audience.
- Multivariate Testing: Leverage the benefits of Multivariate Testing to test multiple elements of a website simultaneously to see which combination works best.
- Auto-Allocate: This activity automatically identifies the winner of multiple experiences and allocates traffic to the best experience.
- Auto Target: Deliver highly personalized experiences tailored to the audience based on their actions with Auto Target; it helps you create the best experiences for all the customers every time.
- Experience Targeting: Make the most of Experience Targeting to offer different experiences to the audiences defined by your criteria.
- Auto-Target: This tool uses advanced machine learning to create automated personalization from combining various high-performing experiences to find the best combination for your prospects.
- Recommendations: When you want to retain the interest of website visitors for a longer period of time, you’ll want to use this activity because it provides recommendations for the additional content for the audience to view. For example, if a video streaming site wants a person to stay on their site for an extended time, they would recommend videos to watch after titling them “Related Videos.”
Location is referring to a page or any other place where you run the optimization. These locations are the places where you can run different activities and experiences. In Location, you can display and swap content for the different visitors, and/or track visitors’ behavior. Location is powerful in Adobe Target Classic because a location can be any element on a page.
Experiences essentially determine what content should be displayed and where elements should appear. When targeting conditions meet, the most suited experience appears for the audience. Experiences contain messages, image assets, HTML links, offers, and more!
Offers are the content that is displayed on your webpages based on the campaigns. For example, when a visitor visits your site during a clearance sale, he/she gets a deal that says, “Buy 2 Get 1 Free.” This is an offer. Offers can contain links, image assets, buttons, and text. You can also personalize offers based on your audience preferences.
Audiences are the groups of people we are targeting. They are defined by criteria such as the geographical location, age, gender, previous searches, and more. Each audience is in the receiving end of highly personalized experiences.
With all of these activities and tests, you can enhance, personalize, and automate your targeting. To top it off, you can also apply targeting to any type of campaigns from emails to mobile apps and see the results immediately. With automated personalization at the tip of your hands, marketing becomes easier; conversion becomes faster, and you become smarter.
Adobe Target is truly a remarkable display of technological advancements. If you want to target your website visitors with more confidence, then use Adobe Test and Target. Once you get used to it, you’ll never want to go back to simple marketing. This is the key to drive in customers and open doors for new opportunities.
Vanity URLs in AEM – Part 2
Configuring dispatcher to get the list of Vanity URLs:
In the given example below, for the demonstration purpose, we had set up an AEM instance and dispatcher in a local machine (PC). Same procedure can be applied in real-time applications as well.
Before making changes to the dispatcher configuration file, follow the below steps:
- Download Vanity URLs Component and install it on publish instance.
- In order to verify that the installation is done correctly, go to /libs/granite and look for dispatcher folder. If you have the dispatcher folder created, then you have successfully installed the package.
Now, give ‘Read’ permissions to Everyone group to /libs/granite/dispatcher/content/vanityUrls.
Now, let’s make changes to the dispatcher configuration file to get the list of Vanity URLs.
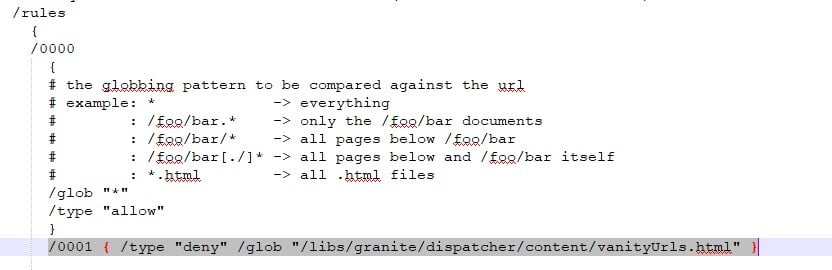
- Open dispatcher.any file and add /000X { /type “allow” /url “/libs/granite/dispatcher/content/vanityUrls.html” } to the /filter section (X can be replaced with any number).
- Now, add a caching rule to prevent caching of this URL. In order to do this, add /000X { /type “deny” /glob “/libs/granite/dispatcher/content/vanityUrls.html” } to the /rules section (X can be replaced with any number).
Now, it’s time to add the vanity_urls configuration. In order to do this, add the following to /farms section.
/vanity_urls
{/url “/libs/granite/dispatcher/content/vanityUrls.html”
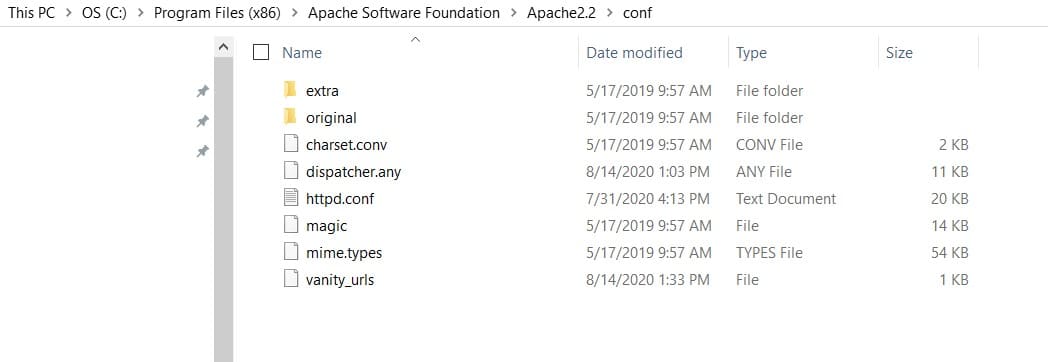
/file “C:/Program Files (x86)/Apache Software Foundation/Apache2.2/conf/vanity_urls”
/delay 300}
url: it is the path of the Vanity URL service that runs on the publish instance.
file : It’s path of the file that stores the list of Vanity URLs.
delay: it’s the time interval in seconds to call the Vanity URL service to get the list of updated Vanity URLs. In the above example, it calls the service for every 5 minutes.
- Save the file and restart the server.
- Navigate to the file path mentioned above C:/Program Files (x86)/Apache Software Foundation/Apache2.2/conf/vanity_urls and you would see the vanity_urls file is created with the list of vanity URLs.
Now, you would be able to access the page using vanity URL using dispatcher which in fact would take you to the original URL.
Example: localhost:8080/analog-dark-wash-jean
Note: If you are not able to access the page using Vanity, make sure you have not added .html while creating a vanity URL. If you have added .html to the end of vanity URL, then remove it.
Above dispatcher configuration is a one-time set up and restart of the server is not required every time we add a new vanity URL on AEM pages. It automatically updates the vanity URLs list with the given time interval.
What is Salesforce-Adobe Campaign Connector?
Adobe Campaign is a marketing automation tool that helps your business to simplify and manage all the marketing campaigns. Using Automation rules in Adobe campaign, you can implement various email marketing strategies for your leads to increase the conversion rate of your campaigns.
Salesforce CRM is a marketing technology that helps you build more meaningful and lasting relationships with your customers. The goal of this solution is to improve business relationships with potential leads and close deals faster.
A good CRM software gathers information from end points across your business to provide you insight into how your customers feel about your product or services and what they are saying about your organization — this helps you improve your offerings, catch issues early, and identify any gaps in business process or technology.
What is Salesforce CRM Connector for Adobe Campaign?
Adobe Campaign provides a Salesforce.com CRM connector for linking your Adobe Campaign platform to your Salesforce.com CRM environment. This CRM connector enables you to synchronize contacts, accounts, purchases, etc. for better integration with Salesforce CRM. Adobe Campaign provides a dedicated wizard for collecting and selecting data from the tables available in the CRM. This provides bidirectional synchronization to make sure that the data is up to date at all times.
What can you do with Adobe Campaign and Salesforce CRM?
- Create new Salesforce leads with Adobe Campaign
- Create new Salesforce contacts with Adobe Campaign
- Create new Salesforce cases with Adobe Campaign
- Create new Salesforce opportunities with Adobe Campaign
- Create new Salesforce accounts with Adobe Campaign
- Secure Integration with Salesforce and Adobe Campaign Standard with encrypted Customer data
- Full Sync or Partial and Bi-Directional sync of data between Adobe Campaign and Salesforce
- Custom Mapping of Salesforce to Adobe Campaign Standard Fields
Conclusion
Adobe Campaign and Salesforce CRM address key challenges for businesses looking to build relationships with their customer base and drive profit. Adobe Campaign provides a Salesforce.com CRM connector that allows you to connect, automate, and sync leads and contacts with Salesforce CRM.
Reference Links:
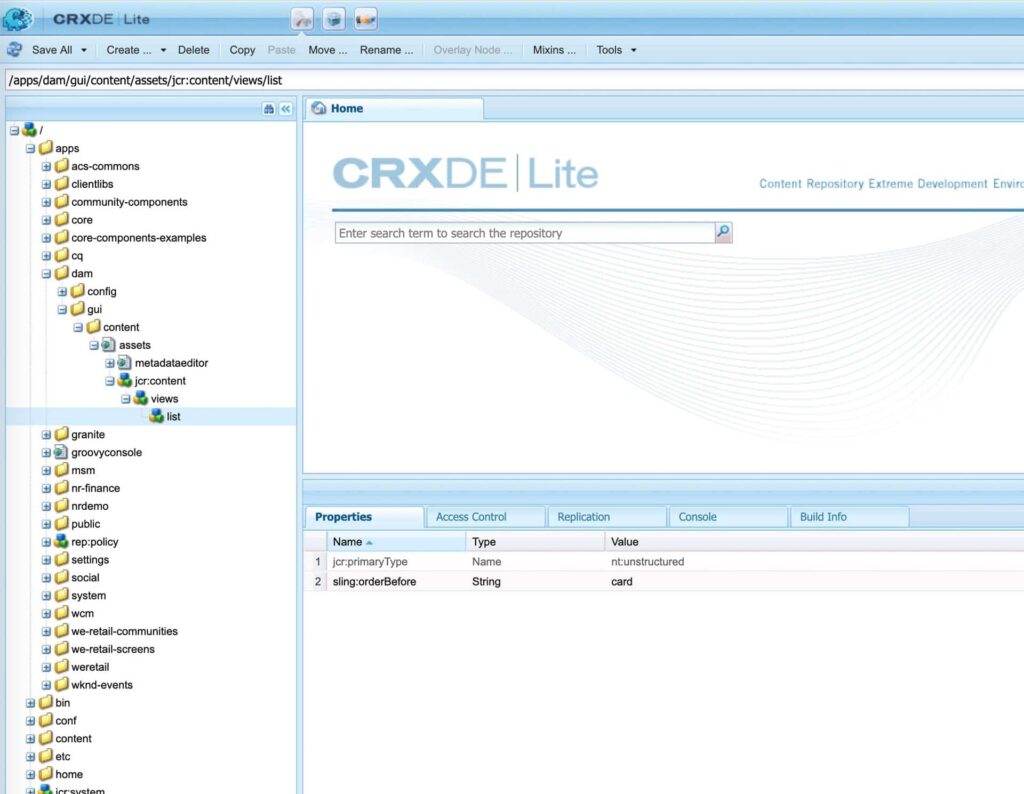
Make List View as Default View in AEM Assets
AEM Assets allows customers to manage their digital assets for e.g., images, videos, documents, and audio clips in a web-based repository. It includes Metadata-support, Renditions, Digital Asset Management Finder and AEM Assets Administration UI.
Most of the AEM Authors like to view their assets in List view compared to Column view and Card view. By default, AEM shows the assets in Card view. Through my experience in AEM, I had found an easy solution to make list view as a default view for assets.
Solution:
- Overlay the /libs/dam/gui/content/assets/jcr:content/views/list and under /apps/dam/gui/content/assets/jcr:content/views/list
- Add a property sling:orderBefore to the list node , something like below
name: sling:orderBefore String card
- The XML looks something like this
- Click on Save All.
Although there are multiple ways you can customize views in assets, this is one the simplest way to achieve this. If you want more tips and tricks on AEM, please check our blog page.
How to Use Crypto Support in AEM to Encrypt/Decrypt Data?
While working with AEM, sometimes we have requirements to call third-party APIs/Services. Configurations related to these APIs/Services like username, passwords, client id/secrets, API keys are usually stored in a code repository in the form of OSGi configuration. This sensitive information should be stored encrypted rather than plain-text format.
This is possible through the OOTB AEM Crypto Support bundle. This bundle provides services for encrypting and decrypting the confidential/secured data through system-wide keys (hmac and master files).
What are the Features of Crypto Support?
- Decryption happens at runtime.
- No one can decrypt the data through the UI. There’s no UI to decrypt the encrypted data. So, the information remains secure.
What are hmac/master keys?
- Encryption/decryption happens through keys (hmac and master files).
- These keys get generated during the first startup of AEM instance.
- In older versions of AEM (< 6.3), these files are stored under /etc/key but recent AEM versions have these files on the file system under crx-quickstart.
- These keys are unique for every AEM instance.
How to encrypt data using Crypto Support?
In order to encrypt a string, follow the below steps:
- Navigate to /system/console/crypto. The console looks like below:
- Enter the plain-text string in the “Plain Text” field and click on “Protect”.
- An alphanumeric value will get generated in “Protected Text” field.
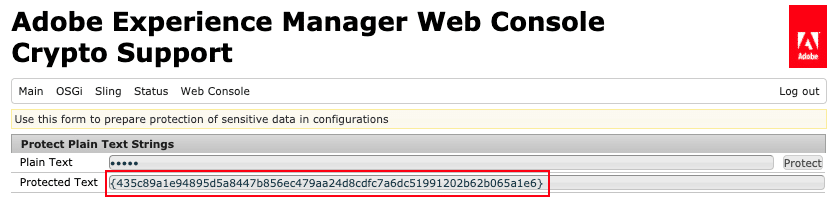
- Copy above alphanumeric value including curly brackets. For e.g. {435c89a1e94895d5a8447b856ec479aa24d8cdfc7a6dc51991202b62b065a1e6}
- Go to code base and put the above value in your OSGi config like below
Note:
- Clicking on “Protect” again, will generate a new alphanumeric value. So, just click once and copy the alphanumeric value and put it in the code base.
- The encrypted value generated for the same plain-text string will differ from one AEM instance to another instance because keys are unique to each instance. We will talk about how to sync keys between the environments in our next blog.
How to decrypt data using Crypto Support:
@Reference
private CryptoSupport cryptoSupport;
public String getDecryptedValue(final String encryptedText) {
return cryptoSupport.isProtected(encryptedText)
? cryptoSupport.unprotect(encryptedText)
: encryptedText;
}
Note: For encrypted data, which is stored in OSGi configuration, we don’t need to call “unprotect” method explicitly as you see above. AEM has a Configuration Plugin to decrypt OSGi configuration properties. This plugin automatically decrypts and returns the plain-text string.
Crypto Support in AEM (Syncing keys among AEM instances)
In our previous blog, we saw how we can encrypt the secured and confidential data through OOTB AEM Crypto Support and store it in a code repository in the form of OSGi configuration.
Crypto Support is based on keys (hmac and master files) which are unique for each AEM instance. Encrypted text generated for the same plain-text string on one AEM instance will be different from another instance. This can raise alarms in cases where we have the same OSGi configuration values shared among Author and Publish instances under the same topology.
For e.g. /apps/my-project/config.prod/com.day.cq.mailer.DefaultMailService.xml.
Here SMTP password for Default Mail Service will be same across all Prod AEM instances. So, in order to make sure that the same encrypted value works on all Prod instances, we will have to sync hmac and master files among Prod Author and Publish instances.
Locating keys (hmac and master files):
Follow below steps to locate your keys:
- Navigate to /system/console/bundles and look for the “Adobe Granite Crypto Support” bundle. .
- Note the bundle ID.
- Navigate to file system: /crx-quickstart/launchpad/felix/bundle<id>/data .
- Open the “storage” file. This file contains just one single line:
- JCR i.e. files are stored in JCR under /etc/key.
- Bundle i.e. files are stored on a file system.
Note: If you have always upgraded your AEM instance using in-place upgrade, then these keys are going to be under /etc/key and there’s no harm in keeping these keys under /etc/key even though latest versions of AEM have moved the keys from JCR to file system (crx-quickstart). We had upgraded AEM for one of our clients from 5.6.1 to 6.1 and a few years later again from 6.1 to 6.3. The client is using Crypto Support and their keys are stored in /etc/key. If at all needed, you can move the keys from JCR to the file system and vice versa.
Syncing keys:
If keys are stored under /etc/key:
- Create a package of /etc/key from the source instance and install this package on the target instance.
- OR go to CRXDE, select node /etc/key; click on the Replication tab and press the Replication button.
- Restart target AEM instance.
If keys are stored on the file system:
- On the source instance, navigate to /system/console/bundles and look for the “Adobe Granite Crypto Bundle Key Provider” bundle. .
- Note the bundle ID.
- Navigate to file system: /crx-quickstart/launchpad/felix/bundle<id>/data .
- Copy hmac and master files from above directory.
- Follow steps 1-3 on target instance.
- Replace hmac and master files on target instance from the source instance hmac and master (copied in step 4).
- Restart target AEM instance.
Note: You can avoid restarting instance, rather you can restart the Crypto bundle “com.adobe.granite.crypto”. The catch here is – if you restart the Crypto bundle through OSGi console, the regular AEM login fails. So, it’s better to restart this bundle through CURL command.
Stopping the bundle:
curl -u admin:<admin_password>
http://<host>:<port>/system/console/bundles/com/adobe.granite.crypto -F action=stop
Starting the bundle:
curl -u admin:<admin_password>
http://<host>:<port>/system/console/bundles/com.adobe.granite.crypto -F action=start
Issues post hmac/master files sync:
If your target AEM repository had SSO/SAML integration, it will stop working after hmac/master files are synced from the source instance.
SSO/SAML integration works based on the trust store and key store. Passwords for trust store and key store are stored in an encrypted format in the repository under “keystorePassword” at below locations:
- /etc/truststore
- /home/users/system/authentication-service/keystore
You just need to the re-encrypt trust store and key store passwords and update “keystorePassword” properties at both the locations. This will resolve the issue.
AEM Application Maintenance Tips and Tricks
In today’s world, Adobe Experience Manager (AEM) is a comprehensive content management solution for building websites, mobile apps and forms. And it makes it easy to manage your marketing content and assets. Adobe Experience Manager can be a real challenge to architect, deploy, and integrate.
A prime factor here is, you need to understand how your AEM application is performing under certain conditions. This is best done by monitoring the application over a long period of time.
When it comes to managing and maintaining an AEM application, it’s not just system maintenance that we should be concerned about, we should also think of it from the application code perspective.
AEM application maintenance is two faceted. One is ongoing, regular maintenance which falls under AEM DevOps/AEM Administrator tasks. Second is following the best practices in application development.
Here we are going to list out the various aspects of application maintenance from both system and development point of view:
DevOps/Admin Tasks
Online Revision Cleanup:
Every update to the repository such as creating, modifying, or publishing a page/asset, running workflows etc., creates a new content version which gradually increases repository size. In order to improve the AEM application performance and avoid repository growth, the old versions need to be cleaned up to free disk resources. This operation is called Online Revision Cleanup which have been there since AEM 6.3.
Unlike Offline Revision Cleanup (aka Offline Compaction), Online Revision Cleanup doesn’t require AEM instance to be shut down. Online Revision Cleanup is enabled by default to run every day. However, the execution time can be adjusted so that it runs in off-peak hours when there’s minimal activity on the system.
You can find Online Revision Cleanup under Tools > Operations > Maintenance > Daily Maintenance Window.
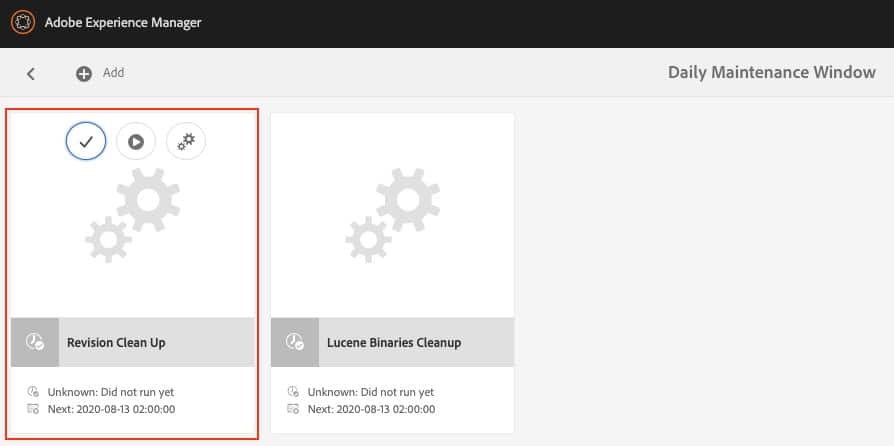
Note: There’s always a chance that running Online Revision Cleanup for the first time may not reclaim any space. The reason is, Online Revision Cleanup reclaims old revisions by generations. A fresh generation is generated every time Online Revision Cleanup runs. Only the content which is at least two generations old, will be reclaimed. That simply means, on the first run, there’s nothing to reclaim.
Offline Revision Cleanup:
Offline Revision Cleanup (aka Offline Compaction) also helps in reclaiming disk resources by cleaning up old revisions. However, in this case, AEM instance needs to be shut down to free up the space. It needs to be run manually using a set of commands and oak-run JAR.
So, what is the benefit of Offline Revision Cleanup? With Offline Cleanup, you can reclaim more space because the online mode keeps one generation while offline mode keeps two generations.
Note: Offline Revision Cleanup should be used only on an exceptional basis.
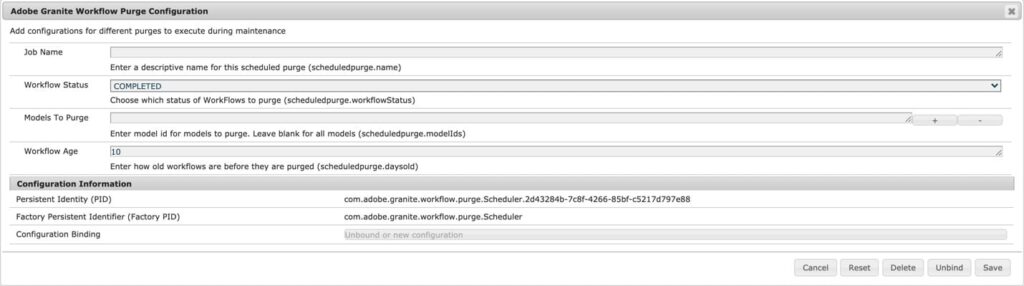
Workflow Purge:
Whenever we upload an asset or modify its metadata, it triggers a workflow. And this is not the only instance which triggers a workflow in AEM, there are many more cases. Along with OOTB workflows, we create various custom workflows during the development cycle for different purposes. Once these workflows are complete, they get archived and never get deleted from system. Hence, workflow purging is one of the mandatory tasks in AEM maintenance to increase the performance of the workflow engine.
Note: Workflow purging can be done for completed as well as running workflows.
You can find Workflow Purge under Tools > Operations > Maintenance > Weekly Maintenance Window.
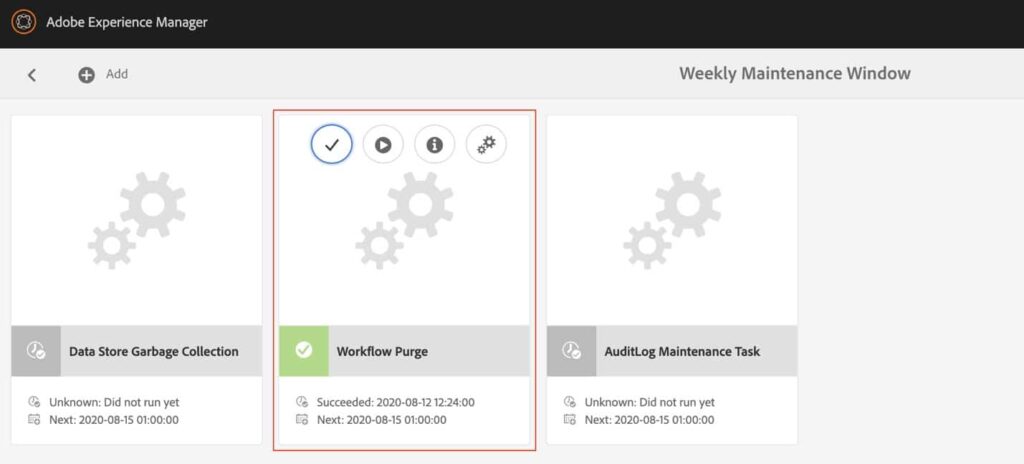
Clicking on the Settings icon will take you to Workflow Purge configuration window in OSGi console. Workflow Purge is a factory configuration which allows you to configure multiple purge configurations for different models and workflow status.
Version Purge:
AEM creates a version of a page or an asset when you can activate the content after modifying it. You can also do this manually using the Timeline tab in sidebar.
These versions never get purged and can be restored at any point of time. The repository size grows slowly over the time because of these versions and therefore they need to be cleaned up to free up the disk resources.
These versions can be purged through Version Purge maintenance task. This task can be scheduled to remove the old versions automatically.
Audit Log Purge:
AEM events that qualify for audit logging generate more archived data. This data can quickly grow over time due to replications, asset uploads, asset deletion, page creation/modification, and other system activities.
This event data can be purged through OOTB Audit Log Purge maintenance task.
You can find Online Revision Cleanup under Tools > Operations > Maintenance > Weekly Maintenance Window.
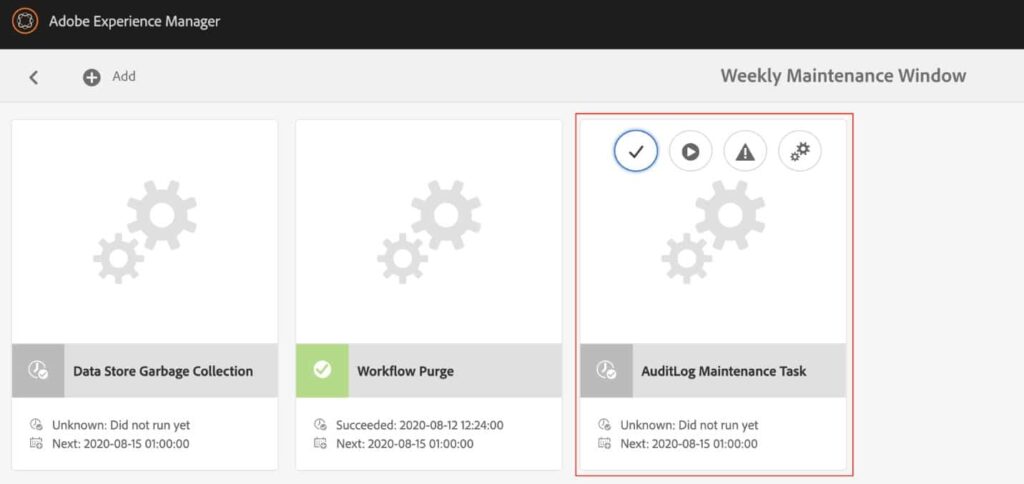
Clicking on the Settings icon will take you to Audit Log Purge configuration window in OSGi console. There are three types of log purge options:
DAM Audit log Purge Rule:
Pages Audit log Purge Rule:
Replication Audit log Purge Rule:
Generating Heap dump:
There are cases when your AEM application may go down all of a sudden after performing slow over a period of time and then runs out of memory. Such problems occur due to various reasons; one possible reason is, JAVA process was started with default heap memory settings. That means the JVM parameter -Xmx was not specified.
If that is not the case, then your AEM application might be retaining so many objects and not releasing them for Garbage Collection. This will cause a memory leak. This issue can be identified through Heap Dumps.
You just need to make sure that your system is configured to generate heap dumps. Heap dump can help you analyze application issues such as:
- Out of Memory Error
- Frequent garbage collections
You can either configure AEM to automatically generate heap dump when “Out of Memory” error occurs, or you can take it manually through OSGi console.
In order to automate it, you would need to add below JMX parameters to your startup script:
- -XX:+HeapDumpOnOutOfMemoryError
- -XX:HeapDumpPath=/path/for/generating/heapdump
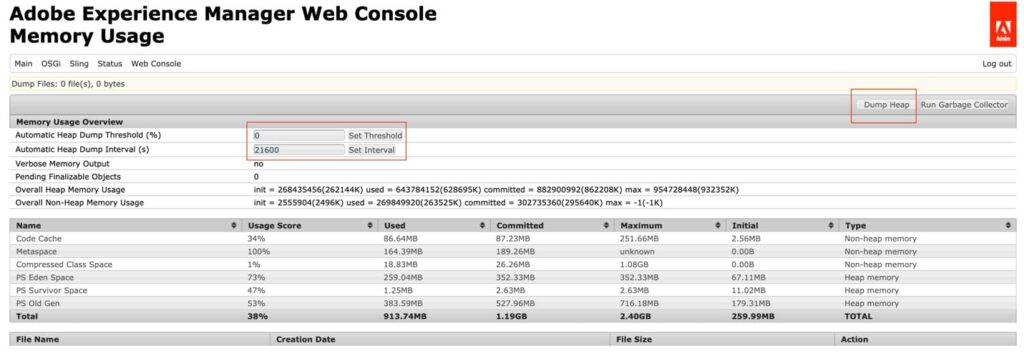
On the other side, to generate heap dump manually, go to “/system/console/memoryusage”. Here you can either generate and download heap dump instantly by clicking “Dump Heap” or you can generate it at a regular interval.
Generating Thread dump:
Thread Dump is a list of JAVA threads that are active in a JVM at a certain period of time. When you want to analyze your application, it is recommended to take 10 thread dumps at regular intervals for e.g. 1 thread dump every 10 seconds.
You can generate a thread dump by using below command:
jstack -l <java_pid> >> threaddump.log
Once you have the thread dumps, you can use any third-party tool to analyze it. There are several third-party tools available.
Few other items to help you improve the AEM application performance:
- Enabling Minification and GZip
- In order to improve the page load time, you should minify JS and CSS files and Gzip them before delivering. Minification actually minifies JS and CSS files using YUI compressor.
- Check the dispatcher configuration
- Check the “/cache” section to see what all things are being cached and what all things get invalidated when you publish a page or an asset.
- Check statfile configuration on dispatcher.
- You need to make sure that your dispatcher is configured in such a way that it caches most of the documents and it passes very few requests to the Publish instance.
Development Tasks
Review all OOTB DAM workflows:
Workflows enable us to automate most of the activities in AEM. It’s an important processing part in AEM and needs to be configured according to the best practices, if not, there can be a major impact on the system performance. Hence, it is highly recommended to plan your workflows implementations carefully.
Minimize the number of launchers in AEM. There are listeners that are responsible for all of the registered workflow launchers: It will listen to all the changes on all of the paths specified in the globbing properties of the other launchers. When an event is dispatched, the workflow engine evaluates every launcher to determine if it should run.
Creating too many launchers will cause the evaluation process to run slowly. For this reason, it is recommended to create launchers only when needed and make the globbing path as specific as possible.
Note: Please disable any out-of-the-box launchers that are not in use.
Do not start Workflows from other Workflows. Workflows can carry a significant amount of overhead, both in terms of objects created in memory and nodes tracked in the repository. For this reason, it is better to have a workflow do its processing within itself rather than starting additional workflows.
Transient workflows:
When a workflow is transient, the runtime data related to the intermediate work steps is not persisted in the JCR whenever it is in processing. To optimize high ingestion loads, we can define a workflow as transient.
Wherever possible, set the DAM Update Asset workflow to transient. The setting significantly reduces the overheads required to process workflows because, in this case, workflows need not pass through the normal tracking and archival processes.
The advantages of transient workflows can include:
- A reduction in the workflow processing time; up to 10%.
- Significantly reduce repository growth.
- Reduces the number of TAR files to compact.
How to make the DAM Update Asset workflow Transient in AEM:
- Open http://localhost:4502/miscadmin on the AEM instance you want to configure.
- From the navigation tree, expand Tools > Workflow > Models > dam.
- Double-click DAM Update Asset.
- From the floating tool panel, switch to the Page tab, and then click Page Properties. Select Transient Workflow Click OK.
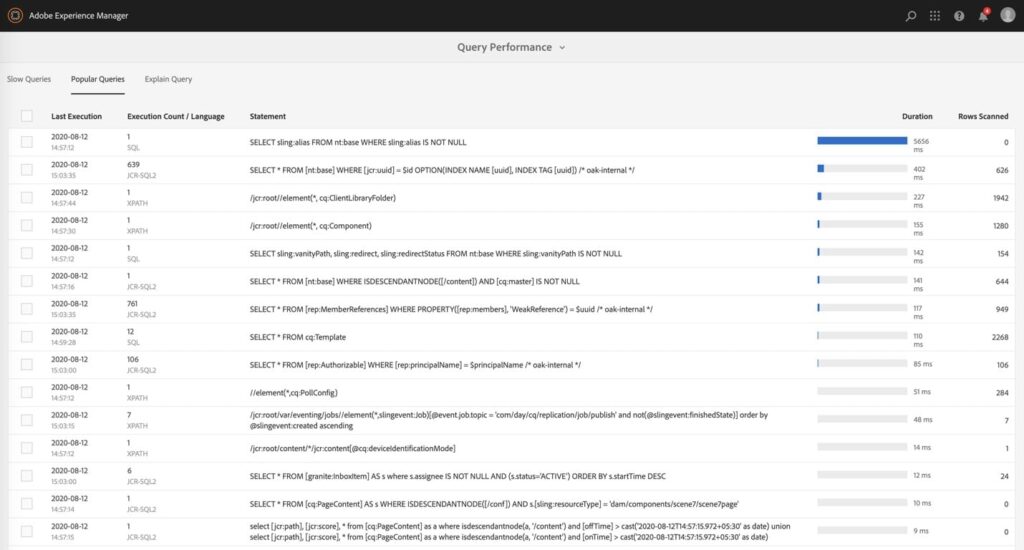
Query Performance Analysis:
Queries lacking a nodetype restriction force AEM to assume the nt:base nodetype, which every node in AEM is a subtype of, effectively resulting in no nodetype restriction.
Setting type=cq:Page or type=dam:Asset restricts this query to only cq:Page nodes or dam:Asset nodes, and resolves the query to AEM’s cqPageLucene, damLucene, limiting the results to a subset of nodes in AEM.
For cases where query execution is fast but the number of results are large, p.guessTotal is a critical optimization for Query Builder queries. p.guessTotal=100 tells Query Builder to collect only the first 100 results, and set a boolean flag indicating if at least one more results exist.
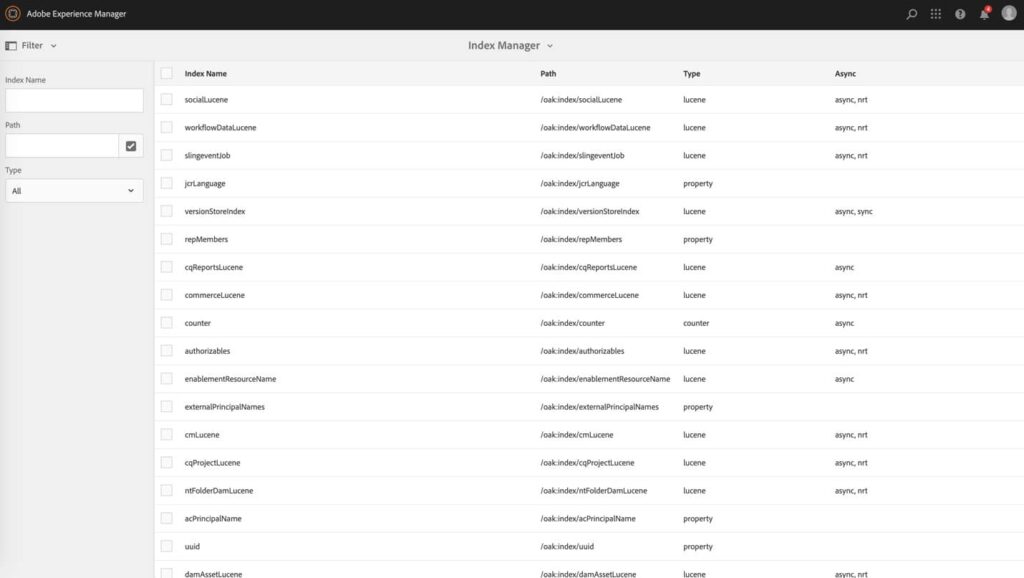
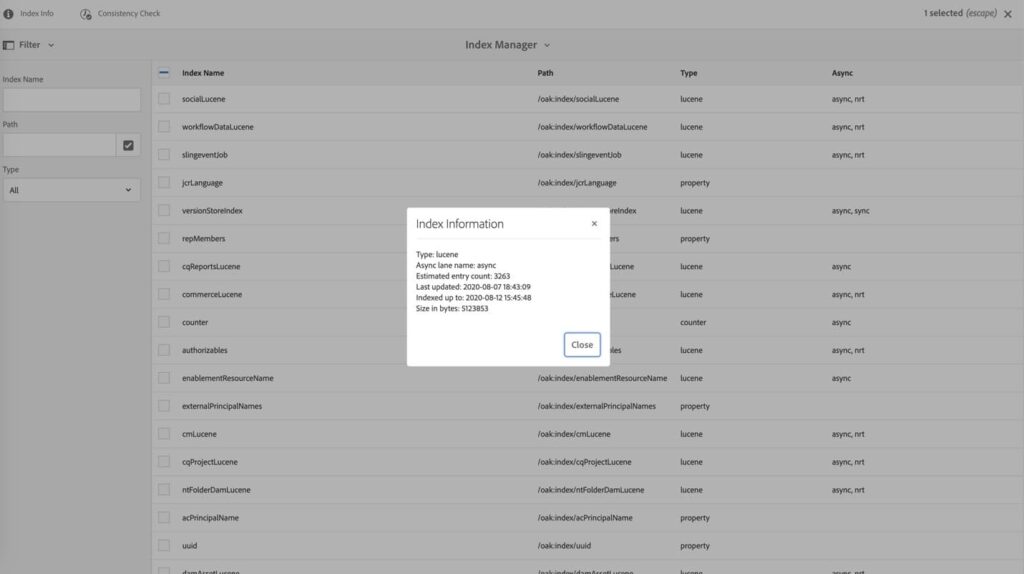
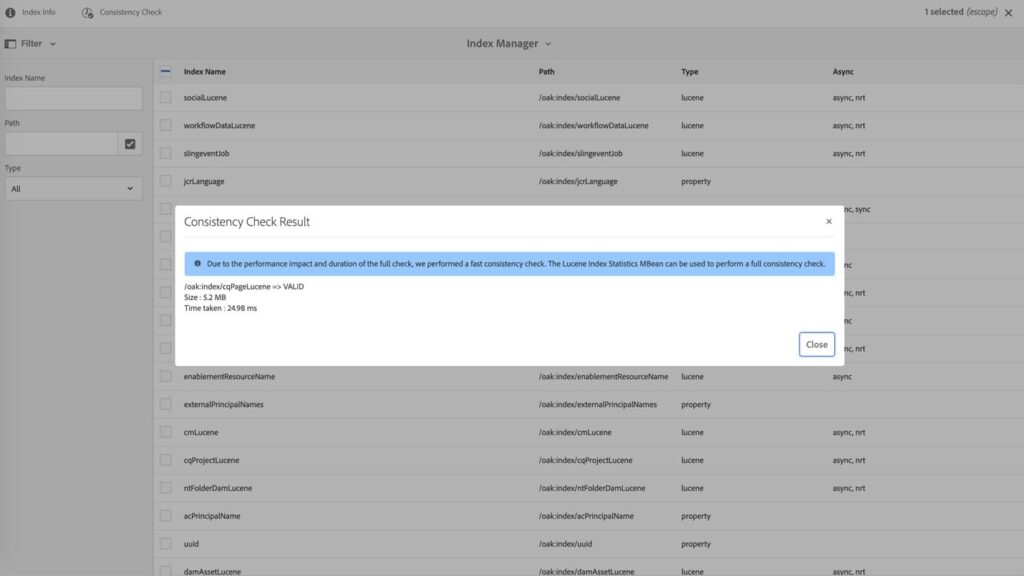
Oak Index Management:
Due to AEM’s flexible content architecture, it is difficult to predict and ensure that the traversals of content structures will not evolve over time to be unacceptably large. Therefore, ensure an index satisfy queries, except if the combination of path restriction and nodetype restriction guarantees that less than 20 nodes are ever traversed. One index is the Property Index, for which the index definition is stored in the repository itself. Implementations for Apache Lucene and Solr are also available by default, which both support full text indexing. The Traversal Index is used if no other indexer is available. This means that the content is not indexed, and content nodes are traversed to find matches to the query. If multiple indexers are available for a query, each available indexer estimates the cost of executing the query. Oak then chooses the indexer with the lowest estimated cost.
AEM’s internal re-indexing process collects repository data and stores it in Oak indexes to support performant querying of content. In exceptional circumstances, the process can sometimes become slow or even stuck. It is important to distinguish between re-indexing that takes an inappropriately long amount of time, and re-indexing that takes a long amount of time because of its indexing vast quantities of content. For example, the time it takes to index content scales with the amount of content, so large production repositories will take longer to re-index than small development repositories.
Why Outsource NextRow Digital for AEM Application Maintenance?
AEM has never been a one-size-fits-all system, and today more-so than ever. Here at Nextrow its fabulous that we do now have such a wealth of options on how to host AEM, and it’s important for anyone who has a stake in the game to weigh their options carefully as to where they’re going to put what will end up being their very most valuable pages and marketing assets.
If you’d like to know more about our AEM Managed Services, you can reach our sales team at +1-847-592-2920 or email us to sales@nextrow.com. The AEM experts at NextRow Digital would be happy to answer all your queries.
How to Implement Search Components in AEM?
Search is one of the key features for any website. Implementing an efficient search component on a website can considerably improve the experience of visitors.
For AEM-powered sites, using Out-of-the-box (OOTB) search component without creating any new indexes has been a challenge. Our main goal here is to leverage OOTB search component and customize it to perform full-text search to enable users to search any word, number, or a sentence including the special characters in AEM website pages as well as DAM Assets. Search functionality shall be customized to different document types including Microsoft office documents and PDFs.
How to Implement Search Component in AEM?
Following are the 4 steps we consider implementing search component in AEM:
- We need to overlay the search component from core/wcm/components/search/v1/search
- Create custom search servlet which uses QueryBuilder API to do full-text search for pages and assets.
- Create search.html file under search component and make sure we call the custom search servlet.
- Refactor Oak Index definition for cqPageLucence (/oak:index/cqPageLucene) to search content tree depth level 4 and
level 5.
Sample code
1.
Servlet map
Map<String, String> predicatesMap = new HashMap<>();
predicatesMap.put(”fulltext”, fulltext); predicatesMap.put(“path”,
searchRootPagePath); predicatesMap.put(“group.p.or”, “true”);
predicatesMap.put(“group.1_group.path”, “/content”);
predicatesMap.put(“group.1_group.type”, “cq:Page”);
predicatesMap.put(“group.2_group.path”, “/content/dam”);
predicatesMap.put(“group.2_group.type”, “dam:Asset”); PredicateGroup
predicates = PredicateConverter.createPredicates(predicatesMap);
ResourceResolver resourceResolver =
request.getResource().getResourceResolver(); Query query =
queryBuilder.createQuery(predicates, resourceResolver.adaptTo(Session.class));
2.
Search html
<form class=”cmp-search__form” data-cmp-hook-search=”form” method=”get” action=”${currentPage.path @ addSelectors=, extension=’json’, suffix = search.relativePath}” autocomplete=”off”>
3.
Refactor Page Lucene index
Output:
Through full-text search, we can improve the user experience on your AEM website. Additionally, the search component will help us in personalizing the site as we can incorporate analytics into this search to understand user requests on a more granular level.
A Comprehensive Guide on how to Create Vanity URL in AEM
Vanity URLs in AEM
It’s important to have a short and meaningful URL structure for easy readability and SEO optimization. As an author or a developer, it would be confusing to generate vanity URLs in AEM. In this article, we would be seeing steps to generate vanity URLs.
Before we proceed on how to generate vanity URLs, lets first try to understand what Vanity URL is.
What is Vanity URL?
In simple terms, Vanity URL is a meaningful short form of the long URL.
Example:
Long URL: https://www.nextrow.com/adobe-experience-manager/aem-implementation-consulting
Vanity URL: https://www.nextrow.com/aem-implementation-consulting
What are the Advantages of using Vanity URLs?
Following are the 4 benefits of using Vanity URLs:
- Easy to remember and pronounce.
- Improves SEO: When vanity URLs are used appropriately, it can be a good marketing gold. Choose vanity URLs that compliments your existing marketing and SEO strategy.
- Increase/create the brand awareness.
- Build trust with the audience.
Now, let’s see how we create vanity URLs in AEM.
Steps to create Vanity URLs:
- Open any page in author instance that you want to create Vanity URL. In this article, I am taking an example of we-retail.
http://localhost:4502/editor.html/content/we-retail/us/en/products/men/pants/analog-dark-wash-jean.html
- Open Page properties and navigate down to Vanity URL section.
- Click on Add and add the vanity URL. Then, click on Save and Close. Behind the scenes, vanity URLs are stored in the property of sling: vanityPath. You can add multiple vanity URLs to the same page.
- If you are adding multiple vanity URLs to the same page, then the values will be stored in the form of an array.
- Now, publish the page to test the vanity url.
- After publishing the changes, you can access the original page using the vanity URL.
I.e.http://localhost:4503/analog-dark-wash-jean.html
NOTE:
- Don’t use the same vanity URL for different pages.
- Vanity URLs are case sensitive.
- You don’t need to add a/at the start of the vanity URL.
- If you are adding multiple vanity URLs to the same page, then the rank of that page gets decreased as link popularity is divided between URLs and the same page competes against itself.
- To overcome this problem, one of the good ways is to configure Redirect 301 and redirect the user to original page.
- To add Redirect 301, you just need to select the checkbox in the vanity URL section in the page properties of that page.
- Publish the page after selecting ‘Redirect Vanity URL’. After publishing the page, when you try to access http://localhost:4503/analog-dark-wash-jean.html, it would redirect you to the actual link I.e., http://localhost:4503/content/we-retail/us/en/products/men/pants/analog-dark-wash-jean.html#meotsuann-28.
However, there are a few limitations with vanity URLs. Vanity URLs don’t directly work with dispatcher. That being said, if an author creates a vanity URL and publish the page, still it won’t be available without updates from the webserver and a server restart. Unfortunately, this can be a challenging task because it entails a continuous update of the configuration files and a restart of the web server every time. In our next blog, we will see how dispatcher work continuously with AEM to get the list of vanity URLs from AEM