Stride Toward Higher Digital Maturity Level With Adobe RT-CDP
Use cases allow us to define the value of any technology outside of its intrinsic value. We read and write use cases every day to know what can be done with a platform and realize its value.
These are crucial to decision-makers and users alike when there is a lot of hype surrounding new tech. Potential is often what’s marketed, but no marketer or business wants to invest in potential alone. We want to know what a platform or an application is capable of before going all-in on one. Enter “Use Cases”.
Read more about Adobe Real-Time Customer Data Platform- The Latest Experience Management Solution.
This new technology might seem too good to be true. So, instead of relying on the marketing points and articles singing the praises of utilizing a CDP, let’s look at a market leader’s – Adobe Real-Time Customer Data Platform (RT-CDP) – use cases before assuming its value in your businesses.
What Is Adobe RT-CDP?
Adobe introduced a new CDP as a revolutionary platform capable of streamlining customer data management, collection, and activation. How? With the help of some awesome capabilities, of course.
Adobe promises better data-driven decision-making capabilities when using Adobe Real-Time CDP. You can harness the full potential of this new technology, and any other, if you know where to start and have a vision for where you are going. First, assess your digital marketing maturity level; then improve upon it by prioritizing investments based on use cases.
What Is Digital Marketing Maturity?
Digital Maturity (or Digital Marketing Maturity) is measured as the capacity to deliver seamless experiences to your customers across all channels with continuous progress. The digital maturity model is based on the analysis of data, how well you are taking advantage of a digital marketing strategy and campaigns.
It is usually broken down into five distinct levels – Initial, Emerged, Focused, Advanced, and Optimized.
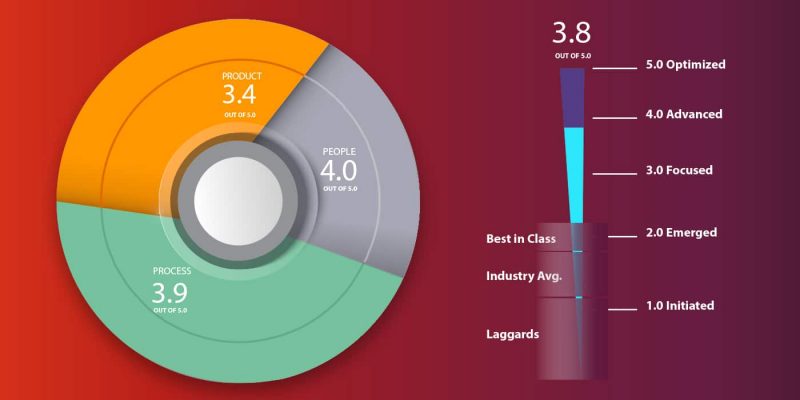
An organization that is focused on advancing their strategies and practices tend to score higher digital maturities and are referred to as Optimized or Level 5. They are usually capable of delivering connected and contextualized customer experiences through a data-driven strategic approach and out-of-the-box mobile experiences. Those struggling with data management and delivering personalized content are found in the lower tiers, like Initial or Emerged.
Your position within these 5 tiers depends entirely on the follow-through taken with data ingestion and manipulation, including the tools and analytics used to do these things. Identify your own organization’s digital maturity level and take a look at the use cases below to see how RT-CDP can promote continuous growth and help you reach the next stage.
Five Adobe RT-CDP Use Case Pillars
Use cases describe how products or services help users achieve a set of goals. Taking a use-case-driven approach to inform investments, like purchasing or upgrading a CDP, can bring to light both existing and potential conflicts and their solutions. Instead of getting caught up in granular CDP spec comparisons, focus on bigger picture capabilities and goals.
Here are 5 of the most useful Adobe RT-CDP use case pillars to get you started:
- Cross-Channel Audience Management
Streaming Data Collection Across Channels
Browsers are vital to consumer interactions, making web analytics an essential focus for marketers. However, the shift toward mobile devices and other connected devices has complicated this, creating even more touchpoints and tracking opportunities.
Many consumers have a preferred method of communication, browser, and device, so marketers should pay attention to all of these and make sure a clear view of customer preferences is created for each contact in their database. So how can you possibly keep all data gathered from desktops, tablets, and mobile apps straight?
Adobe Experience Platform, on which RT-CDP is built, collects data from various sources and apps and delivers it to all applications. Customer journeys are pieced together over time and visible within RT-CDP. With a complete view of the customer journey, marketers don’t rely on “last click” attribution. Instead, they can test and integrate new tools to attribute weight to each interaction. Customer data platforms also track the long-term performance of customers acquired through advertising by associating campaign membership with full lifecycle events and attributes with acquisition sources.
Resolving Customer Identities
With so much data coming in, it’s common for unchecked systems to overwrite existing information, create duplicates, and mistakenly associate incorrect details with contacts. The more complex systems you use, the higher the likelihood of finding inaccurate information in databases.
Real-Time CDP doesn’t rely on personal identifiers alone to track and build customer profiles. Current and historical data is used in conjunction with first-party data to create extensive customer profiles. Anonymous actions are associated with known customers, too, resolving the issue of anonymous profiles and activities for enhanced personalization and targeting opportunities.
- Onsite and Offsite Personalization
Take Segmentation to the Next Level
As RT-CDP collects and stores data from multiple sources, it enables marketers to identify the most relevant content or most appropriate offers for their customers. Based on relevant customer profiles and preferences, RT-CDP applies rule-based and advanced sequential segmentation to boost marketing campaigns. RT-CDP offers the Segmentation service that simplifies dividing customers into smaller groups with similar traits. For instance, say you want to target all those customers who searched for a particular product in the past 30 days but didn’t make a purchase in your upcoming marketing campaigns. The segmentation feature makes quick work of identifying your audience based on these parameters.
AI-Powered Next-Gen Data Management
Modern, successful marketing is all about predicting what your customers want. Understanding customer needs, desires, and problems are of utmost importance to teams developing greater brand loyalty. RT-CDP includes Customer AI, a feature that predicts what a customer will do and why. View influential factors and propensity scores to create detailed segments and optimize customer profiles. An artificial intelligence-enabled CDP solution like RT-CDP allows for preemptive actions creating better customer interactions.
For instance, if a person comes to your site to buy a sofa set, you predict its likelihood. Maybe your customer is delaying purchasing a sofa set but is moved to buy after seeing targeted ads and offers.
Organically make significant impacts on customer decisions with RT-CDP.
- Amplify Retargeting/Remarketing Campaigns
Gone are the days of retargeting ads or mail taking 12-24 hours after a cart is abandoned to be delivered to customers. An abandoned cart turns into a lost opportunity if you don’t entice customers to return or eliminate what caused their departure in the first place. The lost sales revenue from this situation equates to $18 billion eCommerce brands are missing out on.
Enable real-time and onsite retargeting or remarketing campaigns along with cross-channel advertising using Adobe CDP’s streaming segmentation capabilities. Adobe RT-CDP solution helps manage retargeting ads and emails based on customer behaviors, like abandoned carts. Deliver precisely what customers want, when they want it.
Finding a balance with remarketing campaigns is crucial, too, since many nudges can annoy customers and leave a bad taste in their mouths. With RT-CDP, easily set up frequency capping across channels, limiting the number of times an ad is displayed for a customer.
- Privacy and Data Governance
RT-CDP brings data from multiple sources to be used across various destinations, all with their own set of data usage policies to abide by. Since RT-CDP is built on top of the Adobe Experience Platform, advanced data privacy services are built-in, ensuring all users are compliant across the board. This application also uses the Data Usage labeling and Enforcement (DULE) framework to determine how data should be shared across various destinations. For instance, you can restrict activation of a particular segment (such as any partner) across display advertisements for an eCommerce company. - Optimize display media or inventory
Strategically benefit from this RT-CDP, no matter your role. You can optimize the number of impressions, media suppressions, and increase CPM as it adds sufficient metadata into segments. Earlier, DMPs were used for this purpose based on 3rd party cookies, on the other hand, Adobe RT-CDP involves people-based IDs and 2nd party partnerships.
Final Words
Using use case pillars specific to your industry and products for RT-CDP is the best way to realize its value within your organization. Here we have included the most common use cases; however, there are many more use cases for RT-CDP. Have something specific in mind? Let us know.
An experienced Adobe RT-CDP expert can go over your needs, goals, and current limitations to create detailed use cases and help pinpoint the right solution for you. Make every investment an opportunity.
If you are still unsure whether the Adobe RT-CDP solution is right for you, contact NextRow Digital to get a clear picture of your requirements and all possible solutions. Let’s build a true omnichannel vision of your customer’s interaction with your brand with us. Contact us at +1-847-592-2920 or marketing@nextrow.com.
5 Top Reasons Why You Should Migrate to Real-Time Adobe CDP
Customer Data Platform has shown promising features to deal with the challenges faced by Marketers. It gathers all your data in one place so that it can be accessed with ease by everyone for – Sales, marketing, and customer services. It breaks silos in the organization and presents a unified view of the customer data and profile that can be used by anyone not specific to sales or marketing or others. In a very brief period, it has made a significant place in today’s enterprise MarTech stack.
Adobe has introduced a Real-Time Customer Data platform (Real-Time CDP) with extensive capabilities. This new CDP technology solves the problems related to integration, labeling, segmentation, of customer data. Now, you can have in-depth information about your customers to build and execute an effective segmentation strategy based on integrated profiles.
Read how Adobe RT-CDP improves the customer journey.
Though there are many reasons, here we are presenting the 5 most powerful capabilities that could be a reason to migrate to Real-time Adobe CDP (RT-CDP).
Data Collection
With over 40 native connectors, 200+ partners, and more than 75 prebuilt marketing activation destinations, Adobe RT-CDP offers extensive capabilities for data collection. You can feed client-side information, server-side collection (APIs) data, call center data, mobile and app data, in-store data, and data from the CRM system into CDP. The incoming information can be behavioral data, demographic data, transactional data, POS, IoT, device data, and others. Apart from these, Adobe lets you build your own Connectors powered by APIs and get your data in.

Profile Management
The major challenge in delivering relevant digital experiences to the customers is the management of disconnected data and how to tie these data together coming from various channels. Adobe’s enterprise CDP helps in managing disconnected data, providing relevant and consistent digital experiences to your customers. It stitches data together to provide a complete view of your customers by linking identities and creating identity graphs for individuals. Adobe Real-Time CDP takes identity and profile management to a whole new level. It also offers streaming data ingestion that means profiles can be updated in real-time whenever any new action is noted.
No 3rd Party Cookies Dependency
Adobe prioritizes privacy and data governance in data collection and management. This is why it gives priority to first-party data. It stitches durable identifiers (e.g., email ID, contact details, CRM ID, etc.) with pseudonymous first-party cookie IDs. This will give you more control over data sharing and integration and insulate you from the problems that occur because of third-party data.
In Adobe CDP, identities take a different path by pegging them to the data sets. A data set can come in with any ID or multiple IDs and these IDs can be stitched together in real-time. Durable identifiers like email ID, phone number, CRM ID are stitched with pseudonymous first-party cookie IDs. Further, the data sharing and integrations are built on these synced IDs which help you get more control and insulate from 3rd-party data problems.
Let’s talk about what our Nextrow experts can do for
your business.
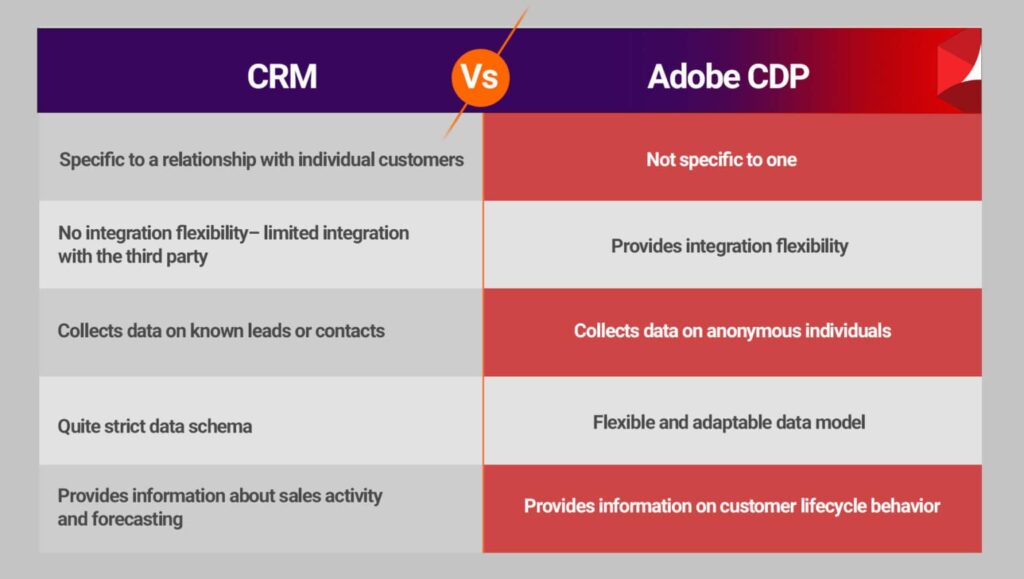
Adobe RT-CDP and CRM
Both are used to deepen customer relations but in different ways. They are different in the way how they are involved in marketing.
Closing Thoughts
Customer Data Platform is growing rapidly in the market and the reason is obvious. DMP and CRM have some equivalent features but overall CDP can stay on top with advanced features and capabilities. If you are confused about which vendor would be a perfect fit for you, see our guide.
For any query and help related to Adobe CDP integration and others, connect with us at marketing@nextrow.com.
Let’s talk about what our Nextrow experts can do for
your business.
A Comprehensive Migration Guide – Adobe Audience Manager to Adobe Real-Time CDP
Introduction
Adobe Audience Manager (AAM) is an industry-leading Data Management Platform (DMP) from Adobe that is slowly taking a back seat to Adobe Real-Time CDP. Why? Adobe RT-CDP is a more robust, first-party DMP solution that is future-proofed for the initiatives around 3rd party cookie blocking and restrictions.
You can continue using AAM, or another DMP, if you focus on limited data sources like Adobe Analytics and some people-based social destinations like Facebook. But migrating to RT-CDP takes your customer experience management to a whole new level. We cover the top reasons to migrate from AAM to Adobe CDP here.
This is an in-depth guide to migrating from AAM to RT-CDP, with multiple migration paths and pointers for each.
Migration Considerations
Migration Options
Here we have outlined a modular approach to RT-CDP migration. You can treat each option as an individual item with almost no interdependencies. These options can also be accomplished together or parallelly.
| Considerations | Comments |
|---|---|
| Marketing use cases | Not all use cases will be migrated to RT-CDP. Due to industry dynamics, some use cases are more affected or unhelpful to continue. Examples of these are detailed in the sections below. |
| Destinations | Third-party cookie sharing (“demdex” cookie or UUID) is the basis of many AAM destinations. These need to be migrated to people-based or 1st- and 2nd-party cookie data sharing during migration. |
| Visitor Volumes for prospecting | Suppose you are using display advertising for prospecting and top-of-the-funnel marketing. In that case, your visitor volumes will take a hit posting when moving to the 1st party-only strategy (or RT-CDP). Advanced planning is suggested. |
| Mobile Analytics & Destinations | Your ID syncs in mobile have synced with a global data source for GAID or IDFA, but this will not be available in RT-CDP. You can still leverage these IDs with appropriate consent to track users across the apps and marketing destinations. |
| Audience Labs and Look-a-like modeling | These two features are not yet in the RT-CDP roadmap, and related use cases are impacted in the short term. |
| Data Sources | Even though the AAM Connector brings all the data into RT-CDP, you need to re-wire them to exploit new data connectors and streaming ingestion. This sometimes warrants a time-consuming migration process. |
| Privacy Labelling | It is worth double-checking any specific data labels and privacy settings applied to sources and destinations after migration. |
| Segmentation Taxonomy | RT-CDP does not have a folder structure to manage large volumes of segments. So, you need to follow a naming convention to name and group the segments. It is recommended to group segments by use cases and teams. |
| Role-based access controls | If you have a large, diversified team with defined role-based access controls for AAM, migrating to RT-CDP might take more time to do bulk updates or API-based updates. In this case, account for more time. |
Option 1: Lift-and-Shift with AAM Source Connector
A good starting point for the migration would be to explore the out-of-the-box AAM source connector. The data from AAM goes into the Adobe Experience Platform (AEP) and is then consumed by RT-CDP (an application sitting on top of AEP). So, in RT-CDP, you are using the data ingestion features of AEP, which is common to other solutions like analytics, campaigns, etc.
How Do You Do It?
- Find the connector in the “Sources” tab under “Adobe Applications.”
- This is a three-step wizard for selecting the segments and mostly does not have any other dependencies.
What is Accomplished?
- All real-time data, like Adobe Analytics SSF, Pixel calls, and email calls, are sent to AEP.
- All integrated profile data from onboarded sources and authenticated profiles are sent to AEP.
- About 8 data sets are created automatically to hold the data in DXM format (can be easily used across other solutions and marketing destinations).
- Segments (and Traits) migrate to AEP.
- Segment size and qualification data migrate as well.
What is Not?
- Destinations are not set up using this connector. (Talk to Adobe Client Care or Consulting to access the list of S2S (server-to-server) destinations and set them up in RT-CDP. Some destinations require ID syncs).
- 3rd-party and 2nd-party data feed and marketplace traits do not migrate.
- Role-based access controls do not migrate. Manually create this.
- Audience Labs and Look-a-like models are not a part of this.
- Destination Data Export Labels do not migrate using this connector.
- Tableau reports like Audience Optimization Reports and Data Explorer are not yet there as a feature in RT-CDP. So, these are not available.
What’s the Catch?
- Even though this is a decent lift-shift migration, this does not allow you to exploit the new futuristic features of AEP.
- Reporting is a serious limitation in RT-CDP, and you might need additional licenses for Query Services and Customer Journey Analytics (CJA) for detailed reports.
- Match rate computations are no longer valid as RT-CDP operates on a 1st party basis.
- Latency of <35 mins for real-time data and <2 days for onboarded (profile data).
After this Migration:
- Marketing teams and agencies stop using AAM UI and switch to RT-CDP UI.
- Campaigns and personalization initiatives continue to run just like pre-AEP days.
Option 2a: Re-Wire Source Connections
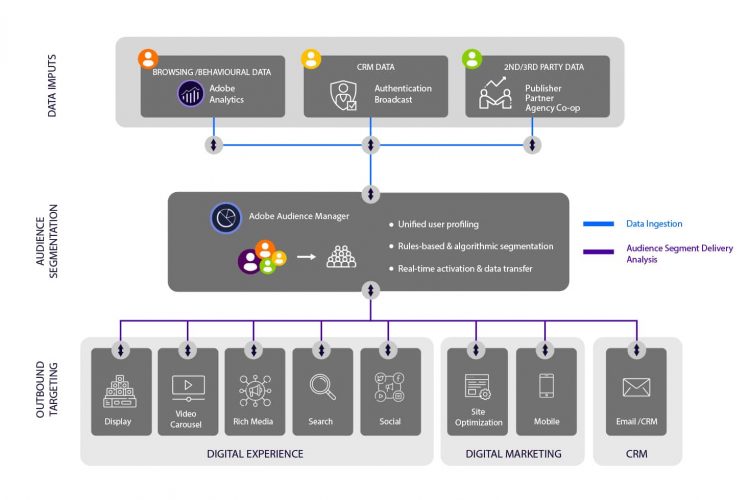
This option involves re-wiring or re-implementing the source data collection through AEP’s robust connectors. This is done after option 1 is completed or at the same time. AAM typically has 3-4 sources of data, as is pictured below:
We can look at the migration strategies for the key sources below:
- Adobe Analytics: Undoubtedly, one of the most significant data sources for AAM is behavioral data from Adobe Analytics. To re-wire this efficiently into AEP, you can either use Adobe Analytics source data connector or re-implement the tags to use AEP Web SDK (alloy.js) to send data directly to AEP.
- CRM: The second most popular most extensive data set would be CRM. AEP has out-of-the-box connectors to popular CRMs like Microsoft Dynamics and Salesforce. You can also use cloud stores and databases to send data into AEP. This should replace the slow and inefficient key-value pair-based files used in AAM.
- Ad Pixels and Email pixels: There are two ways to ingest this data. If you have a source connector, you can set up the connector and configure a data flow. If it is not there, then AEP has streaming endpoints to ingest real-time data, as long as it is in XDM format for AEP. Currently, this can be accomplished only using a custom solution that takes the pixel hits (coming in as Query Strings), transforms them to XDM format, and streams them back to AEP. The true user identity needs to be passed when sending in the hits.
- 3rd party data: RT-CDP does not support a 3rd party marketplace. 2nd party data should be brought in from file storage or cloud storage.
How Do You Do It?
- All the connectors can be found in the “Sources” tab.
- Setting up source connectors is typically a two-step process:
- The first step involves setting up a connection (supplying credentials or account details for the source).
- In the second step, a data flow is configured. You typically need a schema and a data set at this step to ingest the data. It is not recommended to use the data set created in option 1. So, you need to create new schemas and data sets. In AEP, the concept of IDs works differently than AAM. AEP can accept any ID as a primary ID, but the data set can also have a secondary ID. If the data set is enabled for profile, then the look–ups and integration are based on any of these IDs. These IDs contribute and make a “private graph.”
What Is Accomplished?
- A complete re-wiring of the source data to exploit new features of AEP is completed, giving you more flexibility and scalability.
- The foundation for future use cases, AI/ML-based use cases, and journey analytics is laid.
- Data labels need to be migrated from AAM when setting up the schemas and data sets (manually).
What Is Not?
- Only inbound sources are handled. All other things need to be migrated (discussed in the upcoming options).
- Role-based access controls do not migrate. This needs to be manually set up.
- Audience Labs, Look-a-like models, are not a part of this migration.
- Tableau reports like Audience Optimization Reports and Data Explorer are not yet there as a feature in RT-CDP. So, these would not be available.
What’s the Catch?
- Since profiles are based on the same primary identifier (ECID or CRM ID), 1st party profiles and counts would not take a hit.
- But fluctuations in the audience size are expected as AAM numbers are based on UUID (demdex 3rd party cookie), which is not there in RT-CDP.
- You would be required to create new schemas and data set to bring in the data, which would warrant a change in the segment definitions (If you have an option 1 lift & shift migration done).
After This Migration:
- Almost a reset in terms of data ingestion and segment definitions. Capability to ingest more data set into the profiles.
- Marketing teams and agencies can still not use the data (as segments and destinations are not yet set up).
- If you have already accomplished option 1, then marketing initiatives continue to run as BAU.
Option 2b: Re-Wire Destinations and Segments
This phase typically follows option 2, but if you are only re-wiring your destinations, you can do this independently as well. Destinations are a vital component of RT-CDP, and unlike AAM, you can set up the S2S destinations all by yourself. You also get deeper insights on data push and meta-data for troubleshooting the destinations.
During migration from AAM, you need to evaluate each destination to find the relevance to RT-CDP. The latter only supports destinations with durable identifiers. Ex: Google Ad words would require a new setup called “Google Customer Match.” If any destination is not available out-of-the-box, you could share the data using flat files or create a new one using APIs or develop a destination with Adobe Partners using Destinations SDK (new feature). Experts in NextRow can precisely help you here!
How Do You Do It?
- This is done using the “Destinations” section in AEP UI.
- The “Catalog” tab displays a list of all destinations available in AEP, where segments are activated.
- Activating a destination is a two-step process- The first step is to create a destination connection (where you will name the connection and supply credentials for that destination).
- Second, you need to activate the segments (like the segment mapping step in AAM).
- Activation (Shared) data from RT-CDP can be of two types (a) Segments (b) Profiles which depend on the type of the destination.
What Is Accomplished?
- Re-vamped destinations powered by durable identifiers (this step is critical if you are looking to mitigate the effect of 3rd party cookie sunset).
- If you have implemented option 2, then you need to update the segment conditions with new fields.
- Activation data flows to the destinations are set up. You should monitor the data flows either in the “Destinations” section or “Monitoring” section.
What Is Not?
- Only destinations (and segments) migrate. All other things need to be migrated.
- Role-based access controls do not migrate. This needs to be manually set up.
- Audience Labs, Look-a-like models, are not a part of this migration.
- Tableau reports like Audience Optimization Reports and Data Explorer are not yet there as a feature in RT-CDP. So, these would not be available.
- Privacy labels at the data source levels need to be validated manually.
What’s the Catch?
- URL destinations are available as HTTP connection, but it is in the “Alpha” release.
- Some 3rd party data-powered destinations might not be available in RT-CDP.
- 3rd party cookies and ID sync is possible in AEP and is optional. So this could be used till Google sunsets 3rd party cookies (early 2023).
- Metrics like “Overall Match Rate” and “Segment Match Rate” are not available in RT-CDP (instead, it provides some proxy, 1st party metrics like “Activation Rate”).
- Custom destination setup will take time to implement and test. So, it needs to be factored into the migration plan.
- You cannot take transactional data out of RT-CDP for destination or segment performance reporting. You would require licenses for Query Service or Customer Journey Analytics for this.
After This Migration:
Almost a reset in terms of destinations.
- More power is given to marketing and analytics teams to set up destinations and control the type of data shared for activation.
- Some transformations on PII are available out-of-the-box to cover destinations like email providers.
Option 3: Use-Cases Based Migration
You could start the migration process by prioritizing the use cases and accomplishing the new use cases powered by 1st party data with RT-CDP. Then migrate the other use cases to RT-CDP either using an AAM connector or re-wiring the sources and destinations.
A Guide on the Impact of the Significant Use Cases
| Use Case | Visitor Type | Impact on the use cases | Why is there an impact? |
| Personalization | Authenticated & known customers | Low | Easy to integrate and stitch data. Segment activation through People-based and 1st party ID-based destinations. |
| Unauthenticated (Next Page) | Low | This is based on 1st party cookies and will continue as-is. | |
| Unauthenticated (First Page) | High | This is powered by 3rd party marketplace in AAM and would no longer be available in RT-CDP. | |
| Prospecting | Publisher Direct | Low | Easy to accomplish using RT-CDP’s profile sharing. |
| Cohort Targeting | Low | Reaching groups of audiences in a network to continue as-is. | |
| Authenticated & known customers | Low | Easy to integrate and stitch data. Segment activation through People-based and 1st party ID-based destinations. | |
| Targeting Unknown/unauthenticated audiences | High | This depends on 3rd party cookies for targeting and attribution, which would go away with the 3rd party cookie sunset. |
How Do You Do It?
Identify and prioritize use cases based on durable (1st party) identifiers
- Check the sources of the identifiers.
- Implement sources and destination connectors for the use cases.
- Create segments (using the new data sets) and map them to the destinations (If you have many segments, then use the Segmentation APIs).
Identify and prioritize or de-prioritize use cases based on 3rd party data/identifiers
- There are three main uses for 3rd party cookies, which would not be possible once the industry moves to sunset the 3rd party cookies: (1) Cross-property/app tracking, (2) Programmatic Advertising (prospecting) & (3) Measurement and attribution.
- If an alternate 1st party-based solution is available (Ex: Google Customer Match), plan and implement the sources and destinations set up for that.
- Create the segments in RT-CDP based on new data sources.
If use cases can only be accomplished using 3rd party data/identities, start planning to capture and harvest the IDs and establish a 2nd party relationship with the data provider.
What Is Accomplished?
- A use case-based validation and a slow migration process.
- Futuristic use cases are prioritized, and a specific team is assigned to run the campaigns and segment sharing.
What Is Not?
- Role-based access controls need to be manually replicated across RT-CDP.
- Audience Labs, Look-a-like models, would not be possible to migrate.
- Tableau reports like Audience Optimization Reports and Data Explorer are not yet there as a feature in RT-CDP. So, these would not be available.
- Privacy labels at the data source levels need to be validated manually.
What’s the Catch?
- If any customizations are done for data sources or destinations, the time taken for implementation would be high depending on the complexity.
- Any custom destination setup will take time to implement and test. So, additional time for review needs to be factored into the migration plan.
After This Migration:
- There are two separate teams for AAM and RT-CDP. One team executing 3rd party-based campaigns and other 1st party-based ones.
- A hub and spoke model can be established as a part of this to keep both teams in sync.
Closing Thoughts
As you can see, migrating from AAM to RT-CDP requires careful planning, technical execution, follow-through, and time for review. Given the long-term benefits and competitive edge that RT-CDP brings, every CMO organization should prioritize this.
If you have any questions about the migration options discussed above or need further assistance, we are here to help. Working with some of the world’s leading organizations in the field of RT-CDP has given NextRow Digital the experience needed to execute successful migrations.
About NextRow
NextRow Digital is an Adobe Silver Partner with more than a decade of experience supporting clients across industries. We have the right skillsets and proven processes to support your complex needs, from IT to marketing. Grow your business with the help of RT-CDP experts at NextRow!
To learn more about our CDP offerings, visit our RTCDP page.
To learn more about our Adobe Experience Platform offerings, click here.
To learn how NextRow can help with Adobe Analytics assessments, planning, and integrations, contact us at +1-847-592-2920.
How Adobe Real-Time CDP Improves Customer Journey
Customer Data Platforms (CDP) are next-gen technologies revolutionizing customer data storage, management
Adobe Real-time CDP- The Latest Experience Management Solution
What’s true to businesses today? People buy experiences, not products.
For this reason, every business is driving its focus toward improving customer experience instead of improving sales alone. For businesses to stay competitive, each one must offer out-of-the-box experiences to customers to win their attention, interest, and ultimately their loyalty.
We need clarity and authenticity in data for successful ad campaigns and decision-making. As marketers, we accomplish this by using data from various sources delivered in various forms to gain a better understanding of customers. It can be overwhelming and confusing.
The humongous flow of data from various sources and devices has pushed customer data management to this complex, seemingly impossible-to-handle field. Fortunately for us, powerful Customer Data Platforms (CDPs) are available to simplify and modernize managing data. Moreover, you can use it to fuel better short- and long-term customer experiences.
Finding or upgrading your current customer data platform should be a priority for all enterprise marketers. To help guide your decision, consider these three areas: challenges faced by your team, how managing data could solve these, and the differences between one tool to the next.
Below, we’ve done the work for you in the first two areas. Also, we’ve provided a spotlight on the uniqueness of Adobe’s Real-Time Customer Data Platform (RT-CDP).

How CDP is different from CRM and DMP?
Customer Relationship Manager and Data Management platform tools are important and integral part of marketing and sales departments. Their value is undeniable.
These are the functions and limitations of both a CRM and a DMP.
CRM_Function: The customer relationship manager collects and stores all customer-related information from emails, calls, social media, and more.
CRM_Limitation: However, it is not good in dealing with second-and third-party data. This means no insights or significant data from outside sources are housed here.
DMP_Function: A DMP collects and sifts through the data from connected sources to provide an organized view of usable data.
DMP_Limitation: Like a CRM, data management platforms also have a weakness. The 3rd party cookies a DMP relies on to collect data are hindered by adblockers, browsers, and privacy frameworks decreasing their overall efficiency. Also, the data that does come in from third-party cookies can be vague or inaccurate.
With help from these two invaluable tools, introducing a CDP to the mix will give your teams a 360-degree view of data and customer profiles. It supports first-, second-and third-party cookies (optional) with a more extended data retention period.
A Marketer’s Challenges
- Data Silos:- Siloed teams and data make it nearly impossible to work in sync. In order to build a standard, useful view of customers based on data. The first challenge to face is bringing it all together and moving away from silos.
- One system for all:- We need one place to ingest, store, and manipulate all data. So everything can be taken into account when sorting through audiences and actions.
- User identity identification:- Customers engaging with your brand from various devices or in person need to be considered as well. Marketers need to understand users’ identities/behavior across channels to deliver exactly what they want and identify where they are in the customer journey.
- Integration with other marketing tools:- We need to be able to integrate other marketing tools, such as CRM systems, data lakes, etc., to ensure that all data is entering one location and is correct. A tool with seamless integrations is necessary.
Everyone has their own set of current and foreseen challenges, so feel free to add to this list and make it your own. Once this is complete, look at how the points above can be addressed with an adequate CDP tool.
Problem Solved – A Customer Data Platform (CDP) as the Solution
If a single application can solve these issues, why wouldn’t you move forward with one? For the sake of brevity, we will look at how Adobe’s RT-CDP specifically smooths out the wrinkles in customer data management.
Adobe’s RT-CDP (application) is built on top of the Adobe Experience Platform (AEP). Also, it uses several platform services to deliver the functionality needed for a solution as powerful as this. As for how the problems listed above are rectified:
- AEP sources support simple integrations for data ingestion from various systems, including point of sales and analytics. It brings all data together in a centralized system and translates into a unified, flexible data model called the Experience Data Model (XDM).
- With the use of labeling and the enforcement framework, this application provides trusted data and profile management. Marketers can easily apply data governance to a variety of marketing use cases.
- You can create instant, stitched real-time customer profiles, and segments based on the ingested data. The stitching is powered by 1st party, durable identifiers like email and phone numbers. Moreover, RT-CDP can leverage AI and ML features powered by AEP & Adobe Sensei to help enrich these profiles with predictive insights.
- Real-time activation of the stitched segments across destinations with pre-built integrations across social media channels paid media can help close the loop. Also, your IT team can build custom API connectors from AEP to the internal systems.
With the features listed above that directly address the challenges most of face day-to-day, you’re probably curious about the other capabilities Adobe RT-CDP offers. Here’s a bit of further information.
Adobe’s Real-Time Customer Data Platform
Most notably, Adobe recently introduced the next-gen Real-Time Customer Data Platform with unmatched features and capabilities. This future-proof application collects and unifies both anonymous and known data to provide a complete view of all available customer data.
Also, it takes care of privacy and governance policies while collecting and using data. Less risk and more opportunity are what we’ve gained from RT-CDP. Nowadays, well-maintained and insightful customer data is crucial for businesses and this CDP does not disappoint.
Though Adobe RT-CDP is most useful to your organization, we recommend finding a CDP as soon as possible. Even if this solution is not the one for you, any CDP will vastly improve the ROI of all marketing efforts.
Still questioning where and if CDPs belong in your marketing solutions stack? Read on!
Final Thoughts
Customer data platforms like Adobe RT-CDP give marketers more opportunities to connect and serve customers pleasant experiences at the right time and place. No matter where your customers are, you’ll be able to offer them the best experiences with the exact content they are seeking.
If you know your customer better than most, you’re sure to serve them better than most. Adobe RT-CDP helps you stay ahead of the competition.
Implementing a CDP can be a game-changer for your business if done correctly. Complete a successful, fast implementation and integrations with other systems for the best results possible.
Contact us at +1-847-592-2920 or marketing@nextrow.com for more information.
How Adobe Real-Time CDP Improves Customer Journey
Customer data platforms (CDPs) are a new essential for today’s data-driven marketing world. These all-encompassing tools enable marketers to extend their roles beyond brand building and boost customer engagements and acquisitions to return valuable business outcomes.
At present, an enormous amount of data is generated daily and housed in different systems. All these are making data management a massive undertaking and manual tasks nearly impossible depending on the size of your database. Thus, a well-rounded CDP makes data ingestion, profile generation, segmentation, and cross-channel activations easier.
Adobe now offers a reliable CDP solution, Adobe Real-Time Customer Data Platform (RT-CDP), built on top of the Adobe Experience Platform (AEP), for enterprises needing robust data management and performance.
In this blog, we explain the fundamental principles and positioning of RT-CDP within Adobe’s Experience applications. Read along to help determine whether Adobe RT-CDP is right for you.
Where RT-CDP Stands in Adobe’s Cloud-Based Experience Infrastructure
Adobe RT-CDP is an application offering enterprise organizations one of the richest yet straightforward solutions available today. This platform helps marketers to improve customer experiences and create long-lasting relationships with them.
So, how does it align with the rest of Adobe’s applications?
As you can see in the image below, Adobe consolidates its traditional marketing tools such as Adobe Analytics, Adobe Target & Adobe Audience Manager.
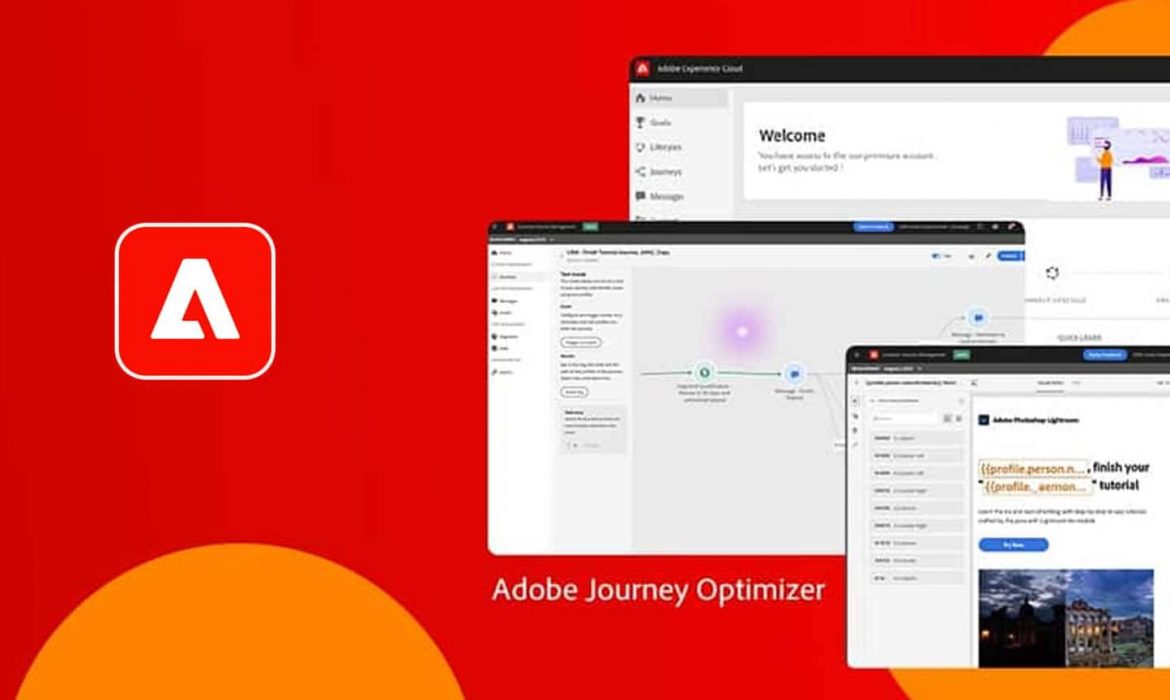
This architecture combines all these separate marketing tools. Also, it creates a single backend for enhanced maintenance, updates, and integrations. However, new solutions like RT-CDP, Customer Journey Analytics (CJA), and Adobe Journey Optimizer (AJO) are natively built on AEP. A meanwhile classic solutions like Adobe Analytics, Adobe Target is still on the roadmap to use AEP as a backend.
With this approach, Adobe is introducing robust and future-proof applications enterprise organizations are sure to appreciate and RT-CDP is one of them.

More on Adobe RT-CDP
In the begining, RT-CDP was introduced as an application service but was later changed and positioned as an “application”. This helps differentiate it from the actual services, like Adobe Experience Platform’s Identity and Segmentation Services.
Under the application category of Adobe’s products fall Adobe Experience Manager, Adobe Commerce, formerly known as Magento, and other classic applications. Moreover, the older apps are not using AEP’s structured backend yet and are only feeding data into the platform.
So, there is a bit of a waiting period before we will see all these applications working as depicted. What’s to come is exciting, but what else can we look forward to with RT-CDP?
RT-CDP Has a Promising Future in 1st-Party Data Context
As Google has already announced its’ “Privacy Sandbox” in 2019, they are shifting their data strategy towards first-party and away from third-party. Soon, third-party data, often used by marketers to track down unknown customers, will no longer be supported by browsers.
Adobe RT-CDP was developed with this in mind. So, it supports first-party data-based customer engagement and acquisition. Also, you can manage customer journeys and profiles in one system without relying on third-party data, building trust with current audiences and potential customers.
Now not only are first-party events and data visible within the platform. Additionally, the data governance and privacy capabilities built into RT-CDP that will keep your organization compliant and trustworthy.
What Else Does RT-CDP Offer Marketers?
The prime feature of RT-CDP is streamlining the management of anonymous and real-time customer profiles in one system. But there’s more to it than that.
RT-CDP can also solve other more extensive problems, such as delivering out-of-the-box customer experiences and:
Single View of Data for Marketing
Without the help of internal or outsourced IT teams, marketers can manage people and account profiles in real-time to deliver unmatched customer experiences. It becomes easier to create complete profiles, including company data and personal data.
These profiles will be updated in real-time with known, unknown, internal, and external data, and RT-CDP features with identity resolution, and person-to-account matching capabilities to unify multiple records at once.
Marketer-Friendly UI
Simple to use dashboards and drag-and-drop segmentation features to cut down on the time and effort necessary to perform routine tasks. Moreover, managing marketing workflows and processes with maximum efficiency and without outside help is much easier.
Data Governance
With this application, marketing practices are automatically more responsible. Manage data access and comply with industry, organizational, and regional governance policies with RT-CDP.
Customizable data labeling for public and private data and use-case policies set for each data label to identify inappropriate data access and a destination are standout features.
Though Adobe RT-CDP offers many enterprises across industries, this CDP solution may not be for every organization. Here’s how you can determine which CDP is right for you.
Extensible Application
RT-CDP is built on an API-first architecture. So, if a feature is not available, you can build it using the APIs. Also, AEP platform services like Query Services, Intelligent Services open up new capabilities in AI/ML which you can use without building big data science teams.
Final Thoughts
In this customer-centric business world, a hyper-personalized, consistent and timely customer experience is the way to success. Real-time customer data platform solutions, no doubt, are a must-have for marketers to stay ahead of the competition.
A customer data platform solution for disparate data and disjointed journeys will improve your marketing efforts ten-fold. Instead of wasting loads of time on development and complex integration, focus on building a robust marketing strategy and maximizing results.
To know more about RT-CDP and related services, contact us at marketing@nextrow.com.
The Definitive Guide To First-Party Cookies In Adobe Analytics
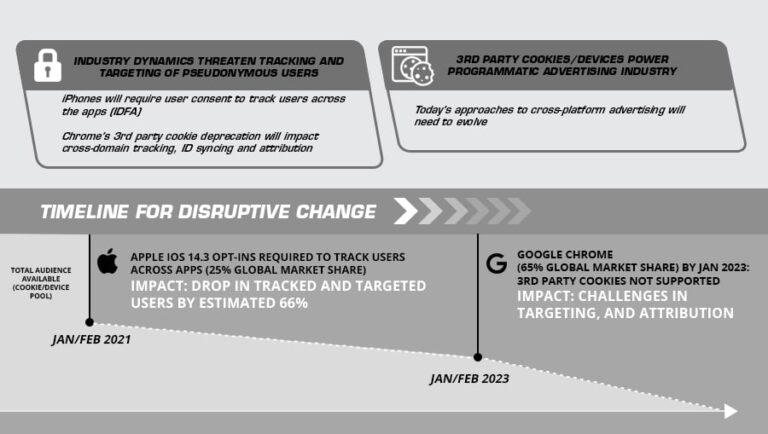
Death of the 3rd party cookie is imminent and with Google’s decision to delay blocking of 3rd party cookies in its widely popular browser Chrome, has given marketers the much-needed time to rewire their implementations. Google Chrome, commanding about 70% market share (2021, Desktop as per netmarketshare.com) is an important part of the web analytics equation. Below is a quick comparison of the cookie pool and timeline.
In this article, we are going to cover how cookies influence your web analytics. We have compiled a guide with foundational steps to make your analytics implementation robust and examine the implications of a 1st party universe. We would be focusing on “Adobe Experience Cloud” solutions like “Adobe Analytics” and “Adobe Experience Platform” in this article.
If you are looking for an overarching strategy, insights related to audience sharing, and tactics that brands can take to embrace this shift, refer to this detailed article here.
How Cookies Influence Your Analytics?
Your Adobe Analytics implementation heavily leans on cookies. Many brands only think about advertising and audience sharing when we talk about 3rd party cookies. They seldom think about their analytics implementation, as cookies are hidden beneath multiple layers. In your Adobe Analytics implementation, cookies dictate the below:
- Visitor identification on the site and across domains
- Persistence of data like across sessions (Ex: campaigns, traffic sources)
- Computation of stitched customer profiles
How Are Cookies Created in Analytics Implementation?
Cookies are typically set using two methods. #1 JavaScript code (client-side) by your tracking library (AppMeasurement or HCode/s_code.js) and #2 using HTTP headers (server-side). Regardless of the method, a cookie needs to be set under a domain. Depending on the domain, it is classified as 1st (same domain as the website), or 3rd party (different domain).
Once this cookie is set, a random ID is set to identify the visitors, which is sent in every beacon call to Adobe Analytics. This data is sent to (Adobe) server at a specific address. This is called as the “Tracking Server” (or ModStat) which is nothing but an end point to collect analytics data. The random ID is valid for 2 years on a rolling basis (except for safari browsers where it is only valid for 7 days).
This “Tracking Server” address can be something like “<your-site>.112.2o7.net” or “<your-site>.sc.omtrdc.net”. But this address can also be customized like “<your-site-name>.metrics.com” or “<your-site-name>.data.com” which is more friendly and will not be blocked by ad-blockers. This approach is done by creating a type of alias at the network level called a “CNAME”.
Generally, you work with your web/network team to accomplish this. The CNAME points to an Adobe end point like *.112.2o7.net or *.sc.omtrdc.net, but this will not be explicitly visible. A CNAME plays an important role in your Adobe Analytics implementation. Adobe recommends using a CNAME as a global best practice.
Guide for Identifying, Assessing, and Planning for Migration
Depending upon your technical architecture and the implementation method, you could be in the any of the below three buckets. Talk to your web/analytics dev team to know about the version or implementation method.
Bucket #1: H-Code or Pre-VisitorAPI.js ID Implementation
If you happen to be in this bucket, then you might be using Adobe Analytics as a standalone solution. Here a cookie named “s_vi” (vi – visitor identification) is used to identify the visitors. These cookies can take both 1st party or 3rd party avatars depending on the tracking server that you are using.
How to Identify the Type of Your Cookie?
- It depends on the “Tracking Server” settings present in the “HCode (s_code.js)” or the “AppMesurement” library (initial versions of Adobe Analytics tracking library without VisitorAPI.js).
- If your “Tracking Server” ends with “<your-site>.*.2o7.net”, then your analytics is implementation is powered by 3rd party cookies. You can also check the domain of the “s_vi” cookie using the Chrome developer tools (under “Applications” tab) and it will be set under “*.2o7.net” indicating that it is a 3rd party cookie.
- If your “Tracking Server” ends with “<your-site>.metrics.com” or “<your-site>.smetrics.com”, then your analytics uses 1st party cookies. (This is when you use CNAME as discussed above).
- If you check the domain of the “s_vi” cookie using the Chrome developer tools (under “Applications” tab) and it will be set under your site’s domain, which makes it as 1st party.
What Should Be the Next Steps if I Am in This Bucket?
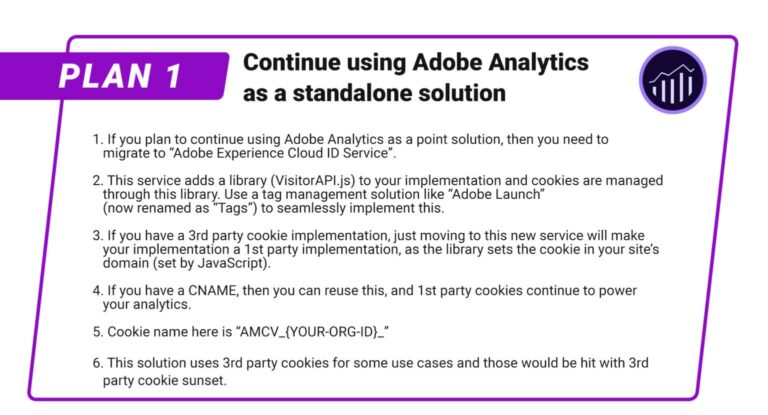
- This is a legacy method of visitor identification, and you should migrate as soon as possible regardless of your expansion plans. Here are possible plans and the next steps:
About Nextrow
NextRow Digital is an Adobe Silver Partner and an expert in implementing Adobe technologies. We have the right skillsets and processes to support your complex needs ranging from IT teams to marketers. Grow your business with the help of Adobe Analytics experts at NextRow!
To learn more about our Adobe Experience Platform offerings, visit our website.
To learn how NextRow can help with Adobe Analytics assessments, planning and integrations, contact us at +1-847-592-2920 or marketing@nextrow.com.
Bucket #2: VisitorAPI.js Implementation or “Adobe Experience Cloud ID Service”
Many of you would be likely in this bucket. This enables Adobe Analytics to be used as an integrated solution with Target, Audience Manager etc. An additional library (VisitorAPI.js) or an extension in Adobe Launch is required to implement this. It uses a 1st party cookie named “AMCV_{YOUR-ORG-ID}” where the visitor ID (called “ECID”/“MID”) is stored and used in analytics calls. This cookie is always set in the 1st party domain.
But this service also uses a 3rd party cookie named “demdex” which houses a 3rd party ID called the “UUID”. The “UUID” is used by Adobe to identify users across domains and across the entire web. The “UUID” is synced with advertising solutions like Google, TradeDesk to target users across the web. The “ECID” is used in internal Adobe solutions.
Example, if your business owns two sites, www.cars.com and www.bikes.com, then a person browsing the sites (from same browser) is identified the same across both domains (thanks to the 3rd party cookie accepting Chrome browser!). The actions taken by the visitor on both sites can combined and used for targeting the visitor precisely across the internet (here it sounds a little creepy!). With the sunset of 3rd party cookies, you will not be able to do this!
How to Identify the Type of Your Cookie?
- Here, irrespective of your tracking server settings, the AMCV cookie (main visitor id cookie) is always set as 1st party cookies.
- The demdex (cross-domain id) cookie is always set as 3rd party cookie.
- If you are using a CNAME, then the only difference is the cookie is set using HTTP headers (server-side).
- You can check the domain of the cookies using the Chrome developer tools (under “Applications” tab).
What Should Be the Next Steps if I Am in This Bucket?
- Cross-domain tracking and advertising use cases based on 3rd party cookies would be worst hit in this bucket. There would be visitor count and profile rests when Chrome rolls out the update. Preparation and planning are recommended. Here are couple of options to minimize the impact:
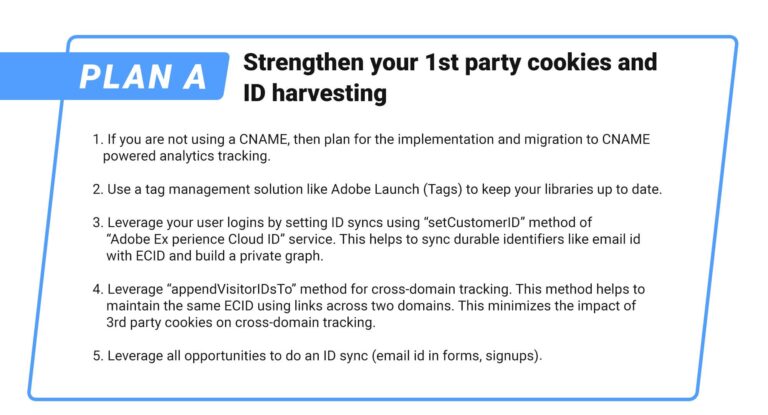
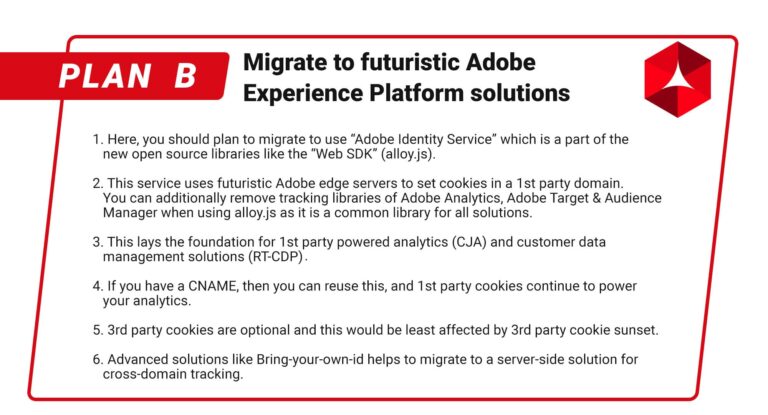
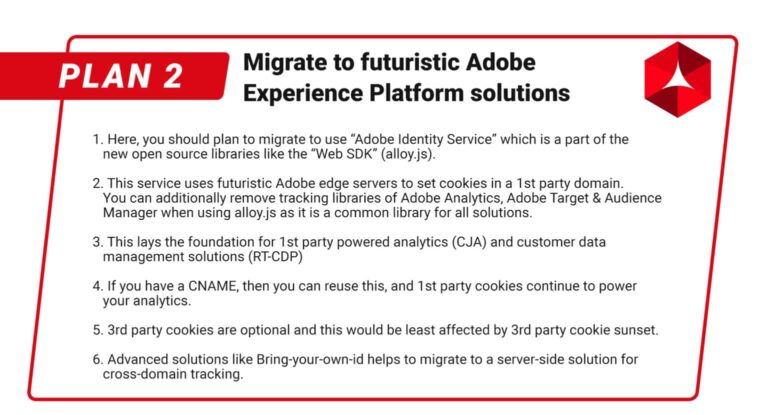
Bucket #3: Implementing Futuristic Adobe Experience Platform
You should consider yourself lucky if you are starting here. Possibly you are starting anew with customer analytics or trying Adobe Experience Platform in a new site/LOB. Here the data collection is powered by an open library called “alloy.js” and available as “Web SDK” extension in Adobe Launch (Tags).
Visitor identification is powered by “Adobe Identity Service” which is the evolution of the previous service that we saw. This brings the focus only on 1st party tracking. 3rd party cookies and tracking are not enabled by default (but available as an option for those who still want to use it).
From here there is only one way to go, which is “strengthening your first-party strategy”. Let’s have a look:
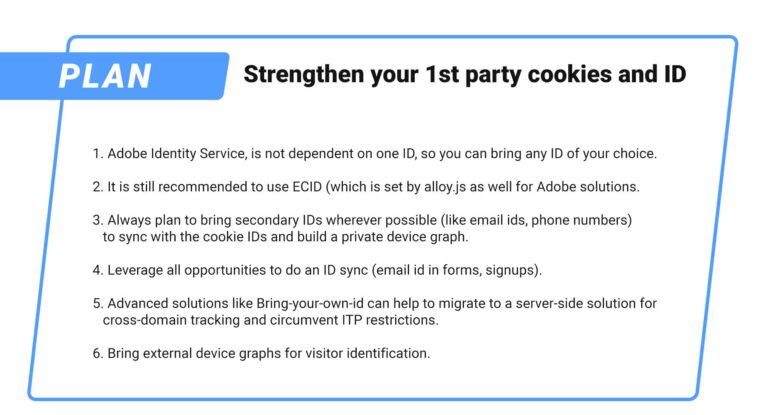
Key Factors to Consider During Migration
Visitor Identification in analytics can be a complex task and especially with 3rd party cookie sunset around the corner, it is imperative to understand the details for better planning and migration. Below are some of the key things to watch out if you are planning for migration, irrespective of the bucket:
Visitor Migration
Ad-Blockers
If you are using a CNAME, then chances of your tracking calls blocked by ad-blockers and other privacy solutions are almost negligible. On the other hand, a 1st party implementation without a CNAME would take a hit.
Apple ITP
With ITP 2.0, safari browsers in desktop and mobile have a cookie expiration period of 7 days. This is true if you use a CNAME as well. When you use “Adobe Identity Service”, you have the option to Bring-your-own-ID which could potentially help you to circumvent the 7-day expiry.
Cross-Domain Tracking
This is a sticky wicket, especially with the sunset of 3rd party cookies. Start leveraging the services to start building the ID syncs now so that there are no big surprises when the time comes.
Privacy
User privacy and choices should be respected at any cost. Even though this is not in the scope of this article, it is imperative to call this out explicitly and Adobe services do a good job of providing tools for implementing this. Please check the respective documentation for details.
CNAME
Conclusion and Next Steps
It is time to have a look under the hood and determine the next steps. Like we discussed above, this much needed time can be used for technology planning, implementation and change management which are the clear ways to stay ahead of the game!
Modern Marketing Analytics and Metrics for Modern Marketers
Modern marketing teams can have countless marketing strategies to drive expected results, from social platforms, advertising to press releases, email campaigns, and more. Marketers continue experimenting with various channels, content, and tactics to promote significant growth in customer acquisition and marketing ROI optimization. All these efforts are in vain, though, with the absence of modern marketing analytics.
Analyzing every campaign, channel, practice, and strategy provides feedback in numbers to let you know if you’re headed in the right direction. It also helps you understand how effective specific strategies and combinations of strategies are when it comes to reaching your goals.
Here, we will explore what modern marketing analytics is, how it is different from traditional (or outdated) analytics, modern analytics key metrics and how it leads to improved ROI, the role of predictive data in modern analytics, challenges faced by modern marketers, expectations from modern marketers, and more. Let’s start by looking at why modern analytics is crucial to today’s marketers.
Why Modern Marketing Analytics Is a Must-Have
When the Covid-19 pandemic triggered adverse effects for businesses everywhere the marketing world was turned upside-down. Altogether, it highlighted the necessity and value of modern analytics in online marketing. Marketers are more thoughtful of their goals and types of metrics that can derive growth in their marketing efforts, but this isn’t just due to the pandemic. Before that, customer expectations were shifting, and marketers needed advanced tools to meet these new demands.
Complex, interwoven marketing channels are now a necessity for enterprises; and the modernization of technology and marketing approaches and channels is crucial to the success and growth of these. To adapt to today’s complex marketing mix, marketers should understand the modern marketing landscape. Moreover, they should identify the factors influencing their customer expectations.

What Are the Challenges It Addresses?
Marketing channels, their usage, and the complexity of each are dependent on the size of the company – most of which applies to analytics. Here are some of the major reasons analytics can become more complicated:
- Investing in more marketing channels and practices is great, but it can be difficult to see where you should invest and where to hold off.
- Your customer may be present at multiple marketing channels. So, you need to connect with them at every channel with personalized, relevant messaging. Multi-touch attribution will help you to understand the influence of various campaigns.
- Multi-touch attribution is wonderfully useful, but the touchpoints across all devices need to be taken into account for optimal messaging and data. You need to reconcile it as best you can.
The tricks to manage these complexities require head and shoulders above your current marketing analytic system. Modern marketing analytics with future-proof capabilities is the key answer to achieving the goals. So, what does this mean? What are the metrics of modern analytics? Let’s find out.
Significance of “Modern” in “Modern Analytics”?
A few years ago, the choice of marketing analytics and attribution use was dependent on several factors such as –
i ) Who is the user? Employees or an expert such as a data scientist?
ii ) Whether it matches the theme of the organization or not.
iii ) Whether it could be embedded or not.
However, today’s marketing landscape is completely different. In fact, a myriad of cutting-edge technology has been introduced. Also, its capabilities have evolved more than ever before in just a few short years. Now, processes and platforms can be future-proofed with modern functionalities and next-gen technology.
Here are a few points that show how modern analytics serves marketers’ evolving needs better:
There are numerous ways through which a consumer can reach your sites. For instance, organic search, paid search, web referrals, direct entrance, newsletter, emails, and more. Now, marketers should focus on the customer journey to find out which action led to conversion and which touchpoints are working more effectively. Sometimes, it is difficult to measure marketing performance across multiple conversion points; as a single user may reach you through various sources and devices.
The multi-touch points attribution model can help marketers work effectively with omnichannel marketing campaigns. This is an algorithm-based model that shares the credit across multiple touchpoints in a customer journey. Thus, it helps you to understand how much each channel is influencing consumers.

The idea of putting customers at the forefront of all efforts is not new. Now, the marketers have unequivocal evidence that fulfilling the customer’s needs and provides a competitive advantage. They must also understand the complexity to achieve customer-centricity; this is not a simple task. Also, it requires commitments at several levels-
i) Design-thinking approach for customer issues and needs;
ii) A centralized platform bringing data from every touchpoint for a unified view of customers;
iii) Predictive analytics from customer journey;
iv) Data about everything a consumer sees and interacts with;
v) And, most importantly hiring individuals capable of using the above information to come up with solutions that resonate with the customer.
Modern marketing analytics unify various channel data into ‘one customer’. Additionally, it addresses the problems of siloed data and siloed experiences. For instance, Adobe based RT-CDP platform provides a holistic and unified view of customer data profiles coming from various channels to deliver a consistent customer experience.

Predictive analytics and AI are what keep many marketers ahead of the competition. These tools optimize the targeting capabilities of marketing teams. Moreover, helping them pick and deliver the most appropriate content for each customer. This level of personalization and awareness boosts engagement and improves marketing effort returns.
Customer journeys are not linear. So, predictive analytics, when used appropriately, can save time for teams needing to react accurately and quickly, no matter the direction individual customers take. We’ll never be able to predict buyer actions correctly 100% of the time. However, predictive analytics takes us much closer, allowing for a modern, more precise approach to customer action.

Future With Modern Marketing Analytics
Modern marketing analytics ensures that the expectations of modern consumers are being met. All these efforts are aligned with proven trends and results. For instance, Salesforce Customer 360 combines all interactions with your customers from website to social channels. So, you can effectively approach your customers with more personalized content at the right time and right place. Likewise, the Adobe experience platform helps you build real-time customer profiles, AI-powered insights, improved privacy, and more.
All in all, shifting from older existing models to unified marketing measurements helps marketers to deal with the challenges of an ever-changing marketing landscape and changes in customer trends.
If you would like to know more about modern marketing analytics and platforms, how they can help scale up your business, or how to choose the right tools and implement them into your business process; contact us at +1-847-592-2920 or marketing@nextrow.com. We are always happy to answer all your queries.
First Party Cookie vs Third Party- Rise of First Party Data
Traditionally, brands have relied on both 1st and 3rd party cookies to power their user experience and marketing activities. Some of the top brands that we have worked with pay almost equal importance to both 1st– and 3rd–party data (obtained mainly through respective cookies) to supercharge their marketing efforts.
Third-party cookies/data were mostly used by digital marketing teams to acquire and remarket customers across the internet. With Apple taking the lead in May 2017 to sunset 3rd party cookies, and Google announcing its “Privacy Sandbox” in 2019, brands are preparing for a data strategy shift. However, after Google announced its extended deadline (late 2023), brands are now questioning their own timelines and further use of third-party data.
What is our take on this?
We reckon that Google’s announcement is going to give the much-needed time to implement the strategy shift, rather than encourage brands to stay with the 3rd party strategy. They’ve given themselves another year at least to make this happen. Let us explore why!
Almost every major brand has invested in technologies like Data Management Platforms (DMP) and Demand-side Platforms (DSP), which rely on 3rd party cookies. They help segment users and show them display ads throughout the internet. In addition, these cookies are used for measuring attribution.
Despite their benefits, 3rd party cookies/data also present major drawbacks, like:
- Users increasingly see 3rd party cookies as a blatant breach of their privacy.
- 3rd party cookies seldom represent a real user and data is mostly inaccurate.
- Data misuse and irresponsible marketing is rampant with 3rd party data.
- Growth of walled gardens like Apple with more flexible privacy choices enticing users.
With increased government regulations and a shift in user mindset, it is becoming increasingly clear that 3rd party cookies are becoming outdated and slowly dying.
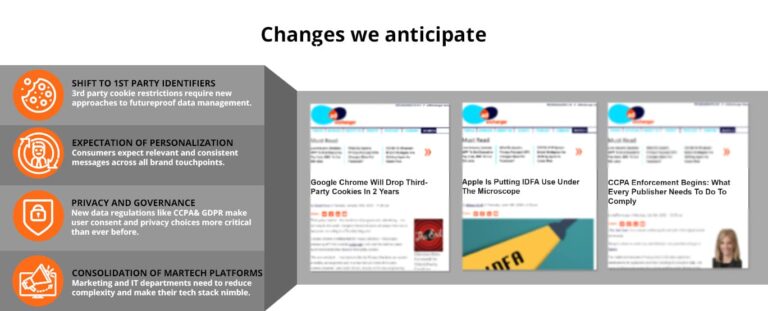
How can brands make this shift possible?
Even though it is somewhat restrictive, at this point, to move to a 1st party strategy, some of our customers have already planned for it. This is a long-term play and there are many impactful benefits to making the shift. Below are a few of these:
- 1st party data is far more accurate and represents a closer model of end-users.
- With user consent, customer trust will build up and positively impact customer retention.
- In the long term, due to scaling, moving away from wasteful marketing will lead to significant savings.
- It’s much easier for brands to share data with a handful of trusted partners and provide meaningful customer engagements.
These pros will not be seen overnight and require organizations and marketing teams to adapt and implement changes in technology and culture first. Technology and related processes are vital to such a transformation.
What are the key technologies at play?
Each marketing technology stack determines how this 1st party shift will become a reality. Today, we often see disparate point solutions, loosely integrated, powering these experiences. Most of the time, these solutions rely on 3rd-party data to reach or intervene in customer journeys. Here are the technologies we recommend every brand to consider:
- Customer Data Platforms (CDPs): A CDP is a 1st party version of a DMP that we discussed above. A CDP seamlessly combines 1st party data to conjure up an omnichannel view of the customer. It enables data and segment sharing based on hashed durable identifiers like email and phone numbers. Customer Data Platforms operationalize privacy and cater to simple view/deletion requests. Adobe Real-Time CDP and Salesforce CDP are some of the offerings from market leaders in Digital Experience Platforms.
- Scalable Robust Data Lakes: A data lake is a vast store of seldom-related data that provides low storage costs and virtually unlimited storage for big data. Such data lakes form the backend of technologies like CDPs and Analytics. Powerful query capabilities allow organizations to gain intelligence on segments and their cross-channel actions.
- Consent Management Systems: With privacy gaining prominence like never before, user choices must be respected. Many governments are enacting complex laws that will result in significant impacts on brands’ processes and finances. Consent Management Systems are imperative to cater to these and seamlessly integrate with solutions like CDP and analytics.
- Systems with open standards: This one is not easy at all! The components of the marketing stack should be open, to be easily integrated with custom solutions. Also, there should be a watchdog to centralize and standardize the data to promote extreme interoperability between the stack and across organizational boundaries.
- Apps built with open APIs: Leading digital experience platforms like Adobe are opening up their marketing clouds with APIs, fostering innovation. Here, one can easily draw parallels to the initial days of the Google Play Store or Apple App Store. These plug-and-play apps are game-changers because they completely democratize your marketing teams (zero IT dependence). NextRow is building an automated cross-solution validation solution called “Predictive” on Adobe’s platform. “Predictive” greatly helps to bridge the gap between business analysts and implementation developers.
Technology Spotlight
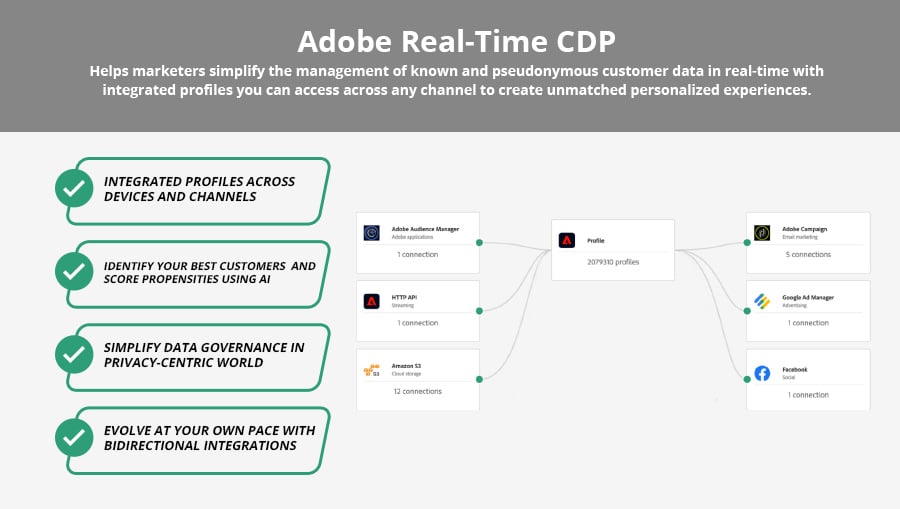
Leading marketing cloud providers (Digital Experience Platforms) like Adobe are emphasizing brands to leverage their 1st party data at scale. Adobe’s offerings like Real-time CDP with features like private device graph and segment sharing enable brands to build real-time customer profiles and activate audiences across channels. This is all done by integrating durable identifiers like phone numbers and emails with pseudonyms or 1st party cookie ids. You can easily leverage Adobe’s platform-level services to accomplish more tasks like big data querying, cataloging, and AI on top of Adobe Real-time CDP.
Way Forward
We envision the customer experience industry going through a cycle of positive disruption, putting users and their choices at the center of responsible marketing. Technology planning, implementation, and change management are clear ways to stay ahead of the game!
About NextRow
NextRow Digital is an Adobe Silver Partner and an expert in implementing Adobe technologies. We have the right skillsets and processes to support your complex needs ranging from IT teams to marketers. Grow your business with the help of RT-CDP experts at NextRow!
To learn more about our Adobe Experience Platform offerings, visit our Adobe Platform page
To learn more about our CDP offerings, visit our RTCDP page.
To learn how NextRow can help with RT-CDP assessments, planning and integrations, contact us at
Adobe journey optimizer-realtime omnichannel journeys for better customer interaction
Please note that while Adobe Journey Optimizer is expected to be released later in 2021, we have only been given a “roadmap” without any commitment to this specific application or its related features.
Whether you’re still catching up on sessions or watching highlights from Adobe Summit 2021, you’re sure to hear or read about Adobe Journey Optimizer. This Adobe Experience Platform Application will be a centralized app “that helps brands to easily identify, create, and deliver the next best interaction,” according to Anjul Bhambhri, SVP Adobe Experience Cloud.
Bhambhri’s description, in addition to the few related sessions, is enough to excite most anyone in the martech space, but there isn’t a lot of information on AJO available as of now. Based on what we do know, here is a general overview of what we hope to see when the application is released and why this tool is such a huge, necessary step in the right direction for martech.
Taking Direction with Integrated Data
Why is it so special?
- Potential – The proposed use of real-time customer profiles to power 1:1 customer journeys would make it one of the most complete profiling tools around. Plus, if the predictive engagement tool is released later, that would give businesses a measurable way to retain and boost subscriber totals.
- Centralization – Audiences today live in an increasingly decentralized world. This is reflected in their actions and many of the applications we use daily, as people and marketers. Adobe Journey Optimizer, as it was announced, gives organizations a way to harness centralized data from our decentralized world and interactions with less effort since it accomplishes similar tasks from other applications in one space.
- Novelity – Up to this point, there hasn’t been an application that pulls in so much data from so many different sources for you to sift through while creating offers and targeting audiences – all at the same time. We have seen some of the capabilities in other applications, like Adobe Target and Adobe Campaign, but never have we seen so much of the data coming to one place for us to see and use at the same time. This groundbreaking solution could save marketing, sales, and design departments a lot of time while increasing personalization and targeting capabilities.
Since it is the first application of its kind, this opens minds up to a whole new realm of possibilities, for the Adobe Experience Platform Application and others. That leads us to the next section.
Adobe Journey Optimizer Use Cases for Marketers
Based on what we have seen at the Summit, here are the top use cases that marketers can exploit, right off the bat with AJO:
- Omnichannel Orchestration: Pair your real-time profiles from Adobe Experience Platform with powerful workflows to create 1:1 resonating messages.
- Power your personalization with AI: Use out-of-the-box AI-enabled features from Journey.AI to optimize the outcomes of your messages.
- Marketing Automation: Transform your approach to the age-old problem of automating your campaigns or transactional messaging with the power of real-time listening across any channel.

Key Benefits
- Add more fire power to your personalization efforts with integrated, real-time data from all your channels.
- Orchestrate and optimize journeys in a single place for improved customer engagement.
- Exploit Adobe’s intelligent services throughout the entire customer journey.
What Might It Change?
The announcement of Adobe Journey Optimizer came as a surprise, but is it a delightful one?
This is hard to say since AJO isn’t yet released, but we do know it will impact many of our roles and duties for the better. Instead of spending as much time integrating discordant systems until they run harmoniously, team members can spend more time innovating, creating other solutions for enterprise clients. Less time will be spent switching tabs back and forth and waiting for multiple programs to load, and marketers can spend more time focusing on customer interactions.
Nothing about the new application is set in concrete, but we at NextRow Digital certainly look forward to seeing AJO in action and being an Adobe partner providing implementation and support services. Contact us at +1-847-592-2920 or marketing@nextrow.com to learn about our Adobe-certified integration services.
How to Maximize your Marketo ROI
Create a Strategy
Advanced marketing automation is made possible through clear and powerful strategies. If you want to increase the efficiency of campaigns, you must define a strategy that includes all steps toward your set goals. You need to figure out:
- What are your goals? Or what do you want to achieve from these campaigns?
- What are the resources you require to complete the job?
Take your achievements to the next level after gaining the ability to create effective strategies and organize resources for important initiatives.
Understanding business goals and data analysis are the two important tactics that need to be considered during strategy design.
Define the goals
Defining goals and analyzing the data of your organization is important. Let’s assume your manager requires SQLs. Then it’s important to understand what SQL means to him. With this in mind, you should then define SQL in terms of your organization. This definition should inform and guide you in creating and measuring adequate program scoring. In this process, you need to break down your goals and define two important terms:
- Business with respect to metrics
- Marketo data
Manage your data
Create customer groups with the segmentation tool. Segmentation helps in sending target messages to targeted customers for a personalized experience. It is important to have relevant data rather than a huge amount of data. When segmenting customer data, consider these:
- How valid is your data?
- Do all fields have correct values?
- Resolving Data duplication issues
- Regularly cleaning data and deleting junk files
Clean out your data and delete junk files regularly to keep your database neat and save time in the future.

Develop Process Flow
With clean data and strategy in place, the next step is to create the development process flow. Keep your campaign’s time zone in mind and start with a personalized message based on specific locations and time zones.
The number and complexity of your campaigns are not nearly as important as the message, delivery, and audience of each. Campaign success is largely based on delivering personalized campaigns to the right people at the right time. Once a campaign is launched, analyze the campaign, its execution, and its advantages and disadvantages to improve future launches.
When you invest in Marketo, you’re also investing in identifying your audience and the individual growth of your marketing team. You don’t need a team of experienced personnel when using Marketo; you can continue with the people who are experts in specific areas and help them expand their skillsets. However, there should always be at least one person in charge of managing campaigns to keep them on track until completion.
Wrap up
How Do Marketo Smart Campaigns Help Marketers?
Sending the right message is not magic, but the results can be. Knowing what the “right” message is can be tricky though; it requires an understanding of a customer’s needs and of timing. Have you ever wondered what will happen if you miss the alert that a potential lead has been triggered, and no one is assigned to deal? You will not be able to act in time, and those valuable leads will become lost opportunities. Smarter marketers avoid this by using Marketo Smart Campaigns, a marketing automation tool that ensures timely actions and simplifies the more complex, time-consuming aspects of your job, such as sending emails, updating field values, scoring leads, etc.
Marketing automation is most efficient when using a tool that can smoothly integrate with your engagement platform and send results in real-time. Stop waiting on those important survey results, and use a trusted automation tool like Marketo Smart Campaign to make your work processes as efficient as possible.
For example, Marketo Smart Campaign connects you with visitors by sending a confirmation email to any user that could be potential lead. Simultaneously, it sends an alert message to you about the lead. This allows you to act fast while remaining informed, making Marketo’s automation critical to your success when used correctly.
Here, we are going to share insights about the smart campaign and how you can use them to achieve your marketing goals. Let’s start by looking at what a Smart Campaign is, what Smart Campaigns do, and how to create one.
Marketo Smart Campaigns
A smart campaign is an automated marketing logic that tells your program what to do when someone interacts with the assets. A smart campaign acts after you define who, what, and when factors for your program. It works in three steps:
- First, you must identify the “who”, recognizing your target audience for the program either manually or by using triggers or batches to build the smart list.
- Then determine what action will be taken when a person interacts with your program.
- And lastly, decide when the smart campaign will take action. It can be activated based on user activity or can be scheduled to go on a specific date or time.
Smart Campaigns make you smarter
Marketo programs are managed by smart campaigns. They send emails for event programs, they add, suspend, and remove people from engagement programs, and measure the success of each program, based on how you define it.
Smart campaigns also control Marketos’s operations. All operational programs, including lead lifecycle, Salesforce/CRM synchronizations, reporting, scoring, Sales Insight, and data management, are handled by smart campaigns.
How do you create a smart campaign?
Smart Campaigns has 3 areas.
- Smart List
- Flow
- Schedule
Smart List
Smart list is a list that includes those you wanted to Target with your Smart Campaigns. It includes Filters and Triggers.
- Filters –
Collect information for the present as well as past time period. It is a powerful tool, depending upon how you are using it. You can use it in different ways, alongside Triggers.
- Triggers –
Activate when certain conditions are met, based on predicted future behaviors, triggering/firing as soon as requirements are met. The most common smart list triggers are links, clicks in the email, form filling, and visiting the web page.
The most popular smart list filters are Link Clicked in Email, Form Completed, Web Page Visited, List Member, and Smart List Member.
Smart lists are also used for many Marketo reports.
Flow
Once the target list is selected, add the flow step. Flows are rules of automation.
- The most common activities you perform on your list are Send Email, wait (before performing any other action), Add to List, Send Alert, Edit Score, Edit Data Value, Synchronize the person with Microsoft Dynamics/SFDC.
- Changing the value of the data is especially important. You can change the value of any person or company field. You can also add a condition using the ‘Add Choice’ function. For example, you can modify the value of a person field, if the field is empty.
Schedule
Finally, you need to plan or activate your campaign. Smart Campaigns are of two types – Trigger and Batch.
Batch Campaigns – considers leads in batch and processes all of them using the Flow. It will run at once or you can schedule it for a specific time.
Trigger Campaigns – considers only one lead at a time to process.
Creation of New Smart Campaign
Step1:
Navigate to Marketing Activities.
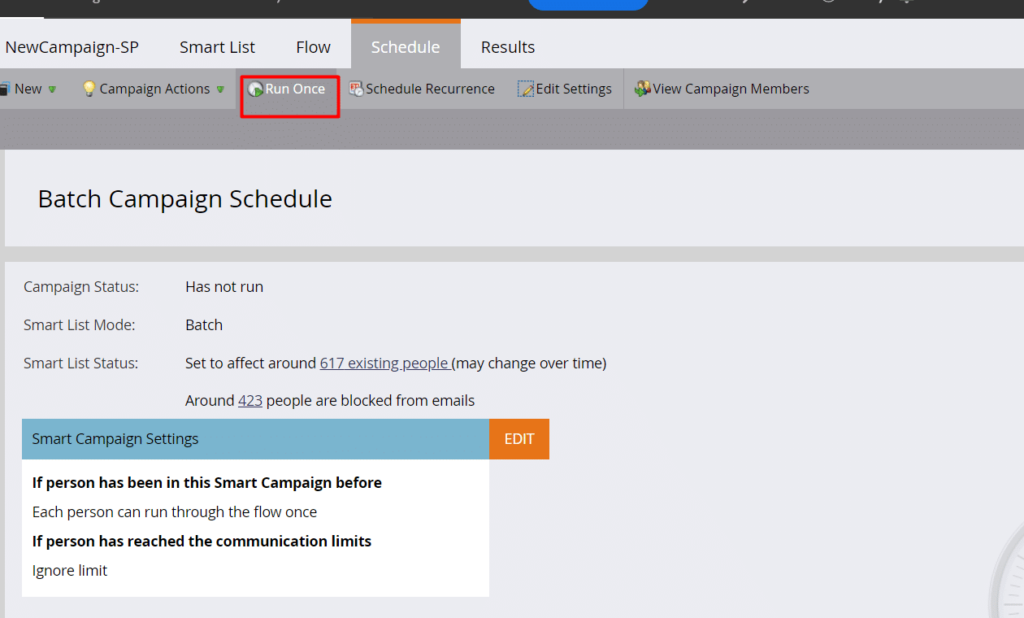
There are 2 ways of creating smart campaigns for the Programs: –
- Right click on the selected Program and click on the New Smart campaign.
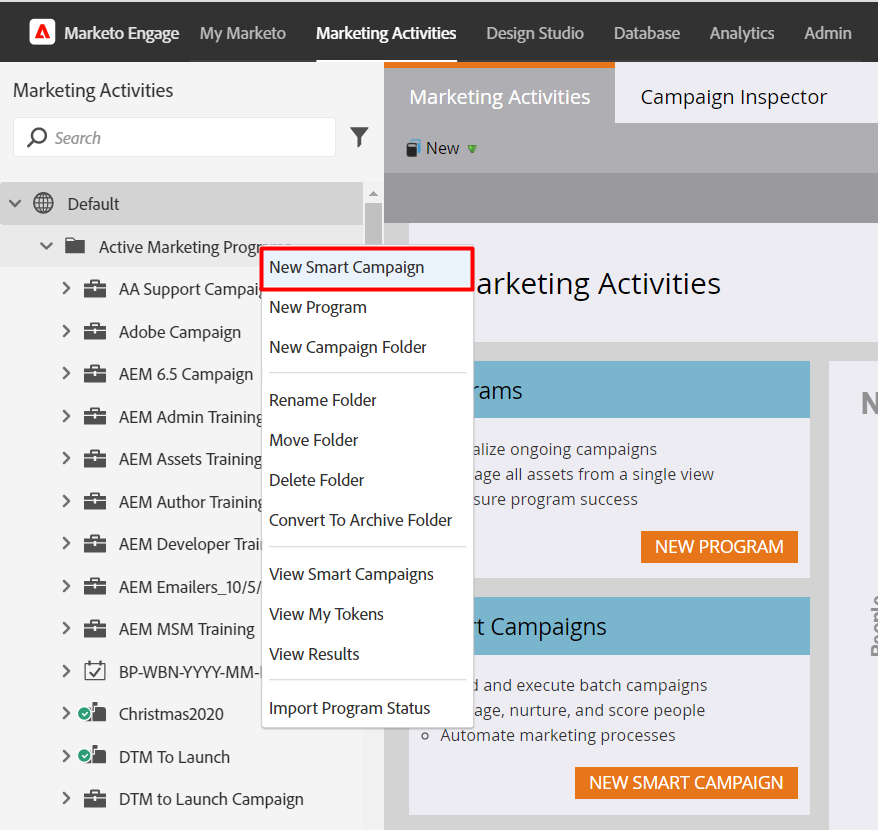
- Right click on the selected Program and click on New Local Asset. Then select the Smart Campaign from the pop-up window of New Local Asset.
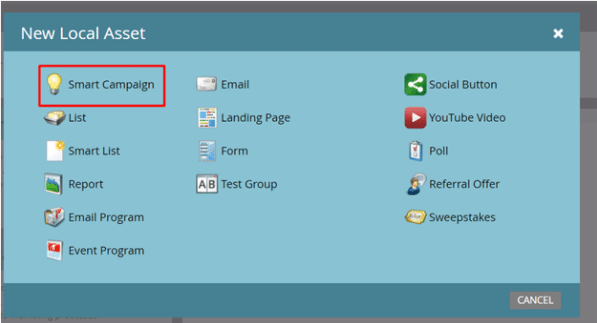
- Enter the Smart Campaign Name and click Create.
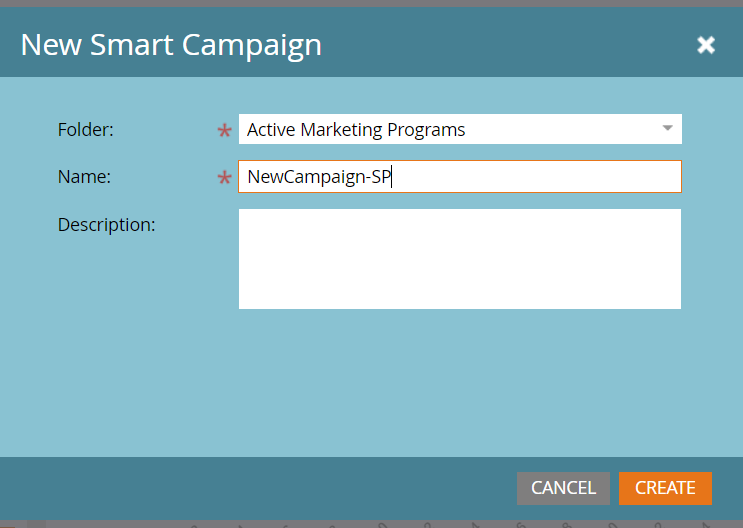
How to create Trigger in Smart Campaign
Step 1: Choose the smart campaign and select the smart list tab.
Step 2: Search for the required trigger and drop it onto the smart list tab.
Step 3: Choose the operator from the dropdown.
Step 4: Define the trigger.
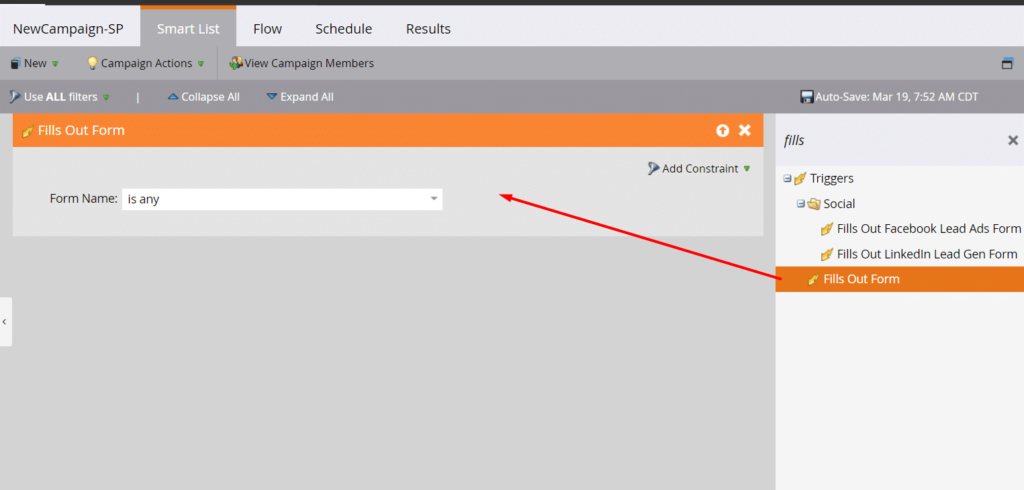
Step 5: Send an email to the respective person who filled out the form and also send an alert to the sales team.
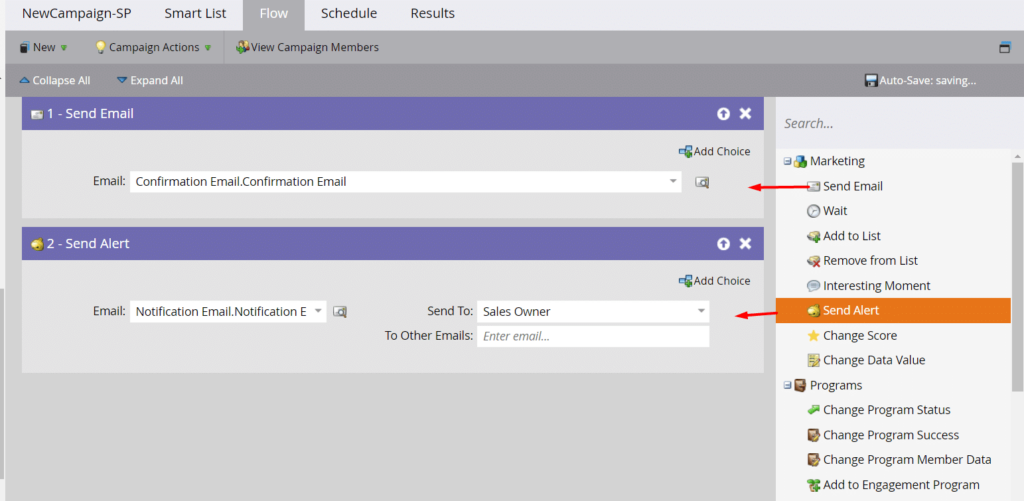
Step 6: Activate the campaign from the Schedule tab.
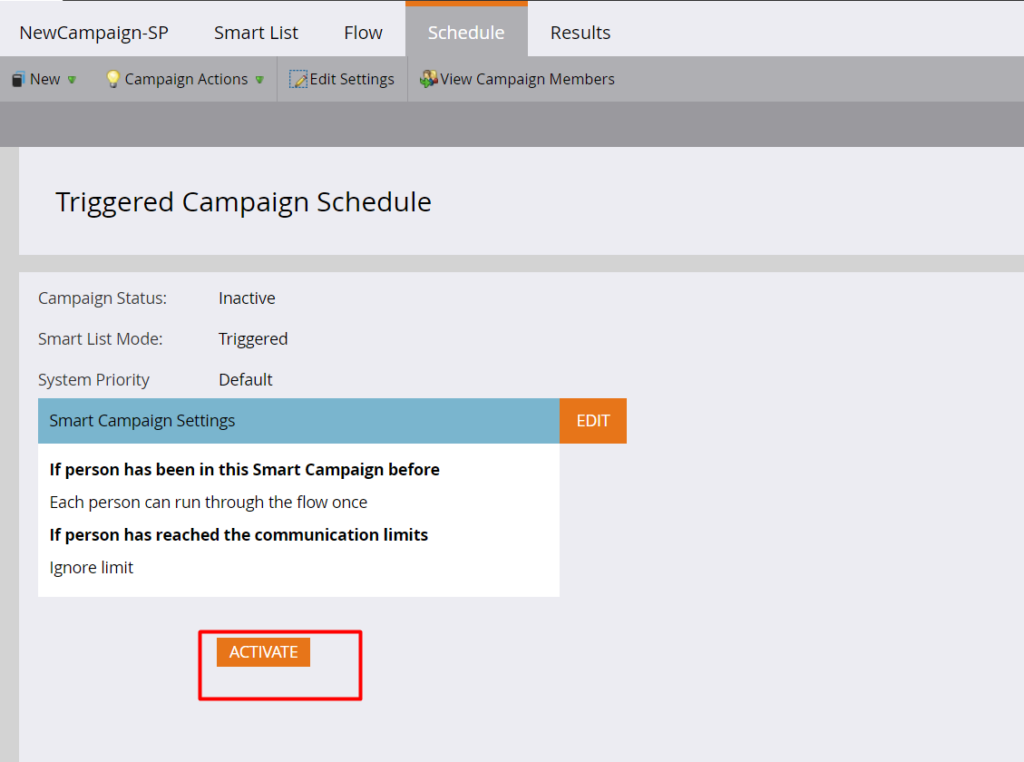
How to Create Batch Smart Campaign
Step 1: Choose the Smart Campaign and select the smart list tab.
Step 2: Search for the required trigger and drop it onto the smart list tab.
Step 3: Choose the operator from the dropdown.
Step 4: Define the trigger.
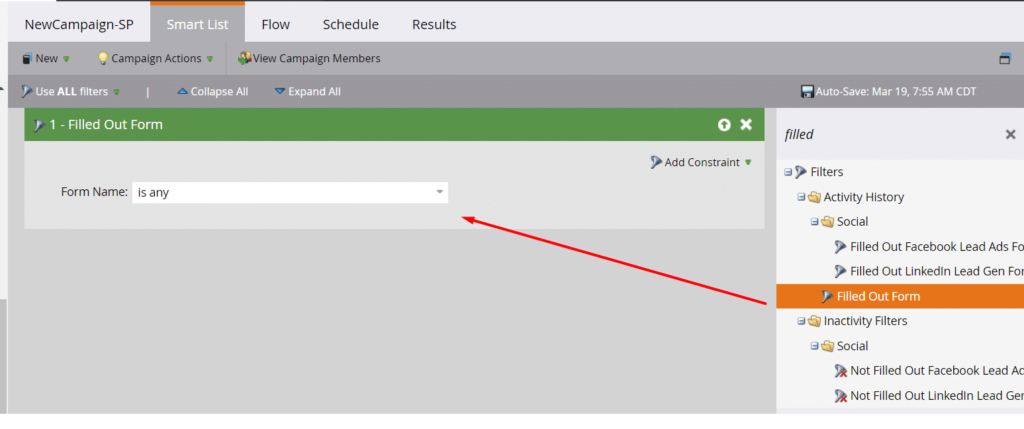
Step 5: The Batch campaign is created for past actions, so the schedule option will not be available. If you run it once, the option will be available.
